nawmalMAKE
User Guide
Getting started - A Quick Guide to Creating Stories
Changing the Set and Characters
Character manipulation buttons
Cameras - Static vs. Smart Camera Event Icons
Rocking the boat or earthquake
This section will help you get to where you need to go within this manual. It will point you towards all the sections covering the most important aspects of story creation within (characters, cameras, story writing, controlling action, etc.) The links in this section (and throughout the document) are hyperlinks similar to what you would find on any website, so clicking on them you can jump directly to the discussed section.
The following features are available only to professional nawmalMAKE users and not in nawmalEDU
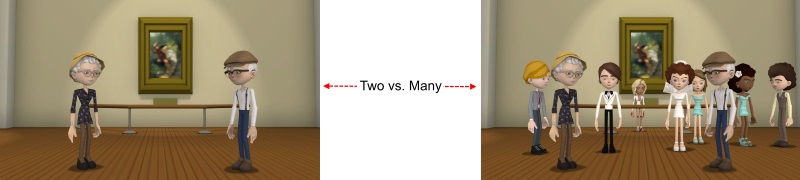
| Party time! nawmalMAKE can handle more than 2 characters in the same scene: | |
 |
|
 |
Actors can be dragged around and positioned anywhere in the scene. Have them hover in the air, sit on a desk, or be halfway through the floor. You’re in control. |
| Sitting actors. You decide whether your actors are sitting or standing. |  |
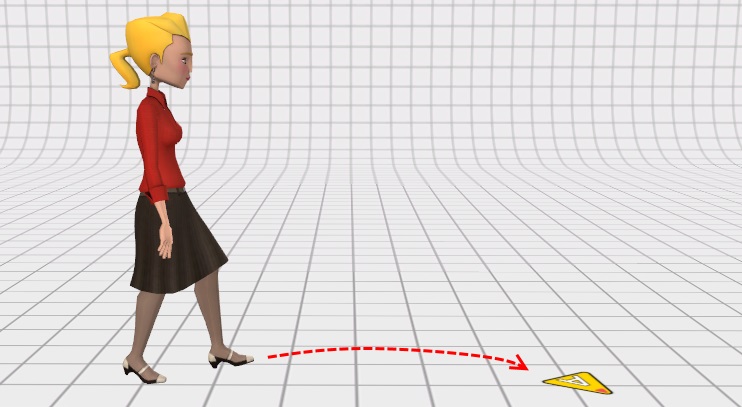 |
Walking actors. What’s 3D without motion? nawmalMAKE allows you to make actors walk around the scene. And it doesn’t stop there, you can make them teleport too! |
| nawmalMAKE’s users have access to the Suits collection that features character customization |  |
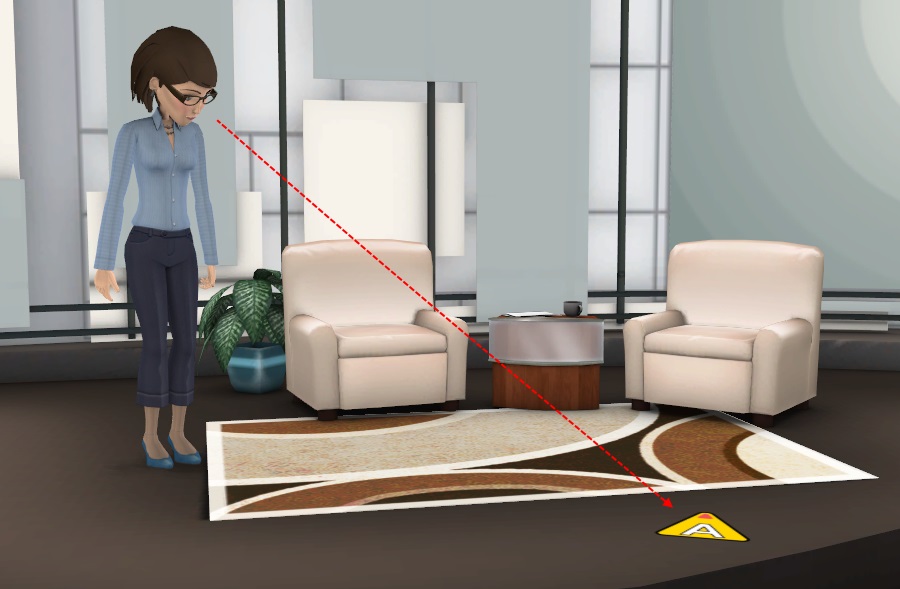 |
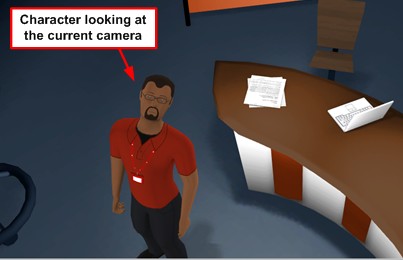
Actors can look at custom targets which can be placed anywhere in the scene |
| Custom camera angles allows you to frame your actors exactly how you want it |  |
 |
Or use the Smart cameras to quickly frame actors |
| Camera motion during playback. We’ve made it easy to make the camera move during your movies. Do things like dollies, pans, zoom-ins and much more. | Better voice acting! Record your own voice, or import audio files, and have the character lipsync to your performance perfectly. |
The following steps outline the story creation process. Subsequent sections provide greater detail.
Login inThe first time you start up , you will need to provide your nawmal credentials in the login window. The username corresponds to the email used when you signed up. If you can't remember the password sent to you after signup, please contact support. | 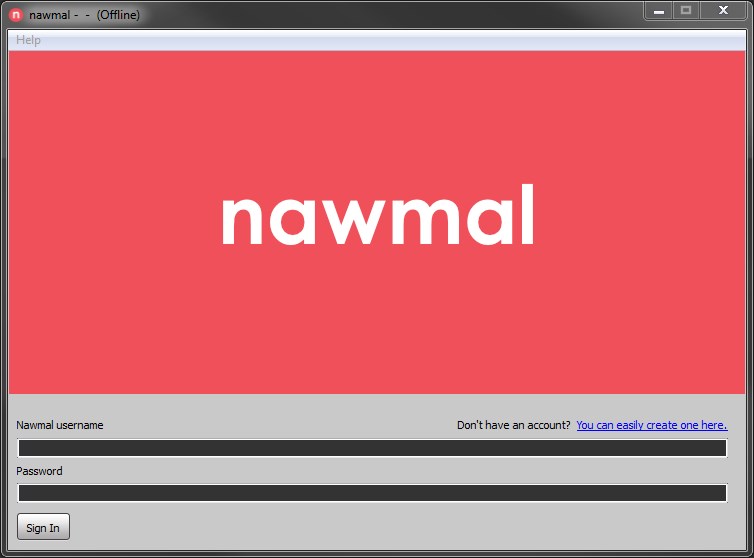
|
Local network authenticationSometimes, in a corporate or government network, you will be asked to provide proxy credentials. These will be usually be the same as your domain credentials. Please contact your network administrator in order to find correct settings. | 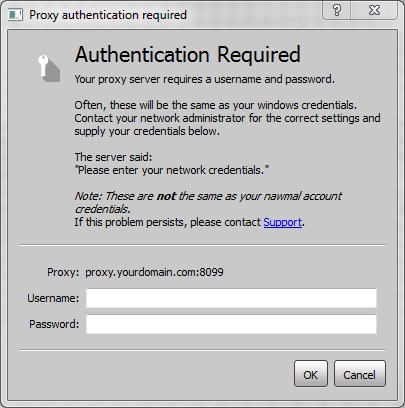 |
After your first connection, you will be greeted with a default project that will help you discover some of the features of the application. You can save it for later use, or follow the next instructions to create your own project.
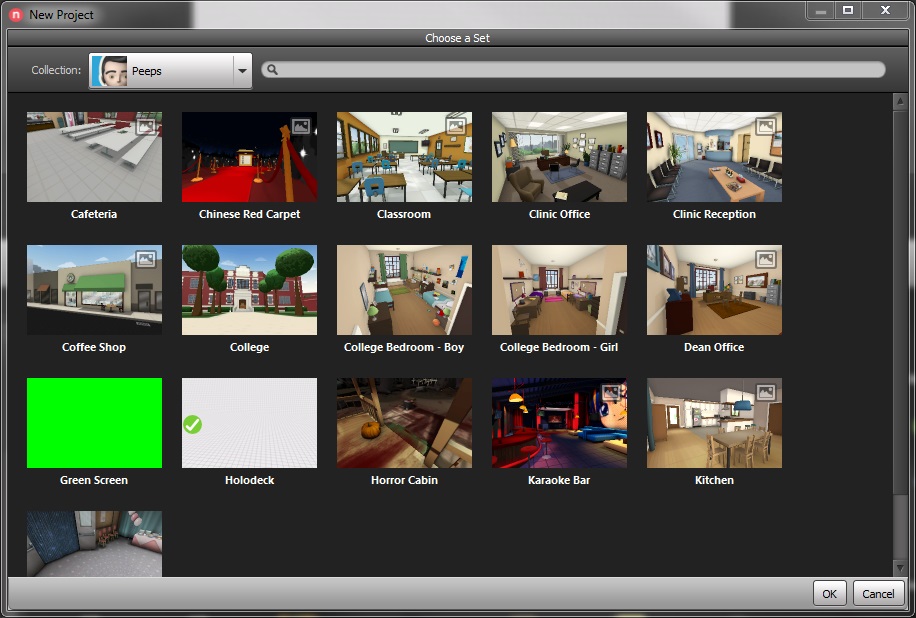
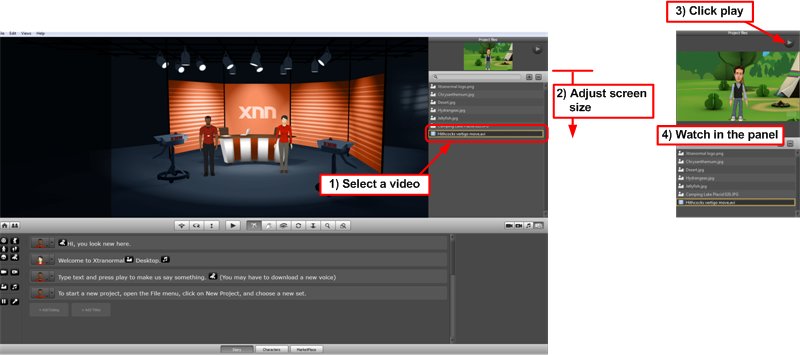
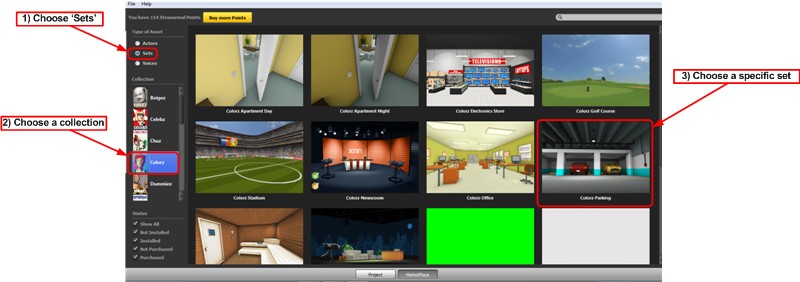
To start a new project, click on the File menu, select a collection and then a set. Confirm your choice by clicking the 'Ok' button at the bottom right of the window.
Note: If you are currently evaluating , some of the thumbnails will have a small lock icon. All of these sets and actors will be available to you with the purchase of a subscription, but they can't be used during the trial period. There are over 100 sets and more than 400 actors to choose from in the complete library!
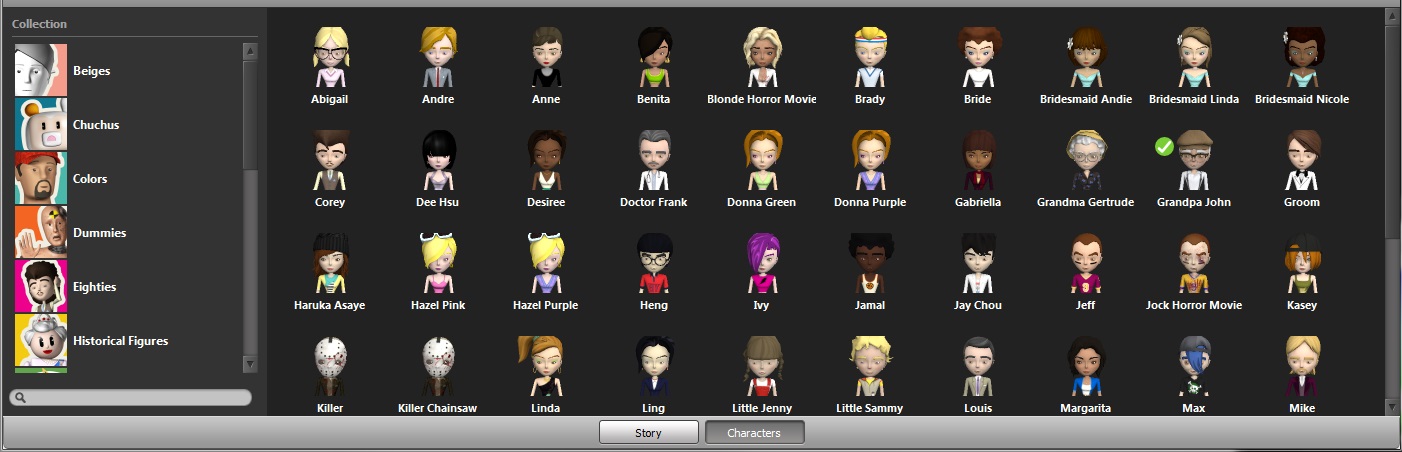
Once you've chosen the set, you can add an actor to the scene. By default, the same collection from which you've picked the set is selected for you, but you are free to choose another one. The list of collections is in the section at the bottom left of the window.
You can then drag & drop one of the actors from the bottom section to the 3D view at the top. More details on adding characters here.
 .
. 
The story dialogue is written in the Writer and is spoken by the actors via Text-to-Speech technology or recorded voices. Simply type some text and the actor will say it. Many voices of different languages can be installed. See how here. For details about voice recording, see voice recording.
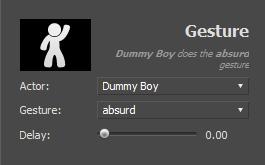
There are many Triggers that you can drag-and-drop directly into the dialogue to liven up a story; these Triggers control aspects of character behavior and cinematography. For example, the Gesture Trigger ![]() makes an actor perform one of dozens of animations such as waving their hand or doing the thumbs up move. The timing of the Trigger is powerful yet simple; all you have to do is place it in the dialogue and the action is performed at that moment during playback. You can change the settings of the Trigger by clicking on its icon in the text and tweaking the values in the section to the write of the dialogue section.
makes an actor perform one of dozens of animations such as waving their hand or doing the thumbs up move. The timing of the Trigger is powerful yet simple; all you have to do is place it in the dialogue and the action is performed at that moment during playback. You can change the settings of the Trigger by clicking on its icon in the text and tweaking the values in the section to the write of the dialogue section.
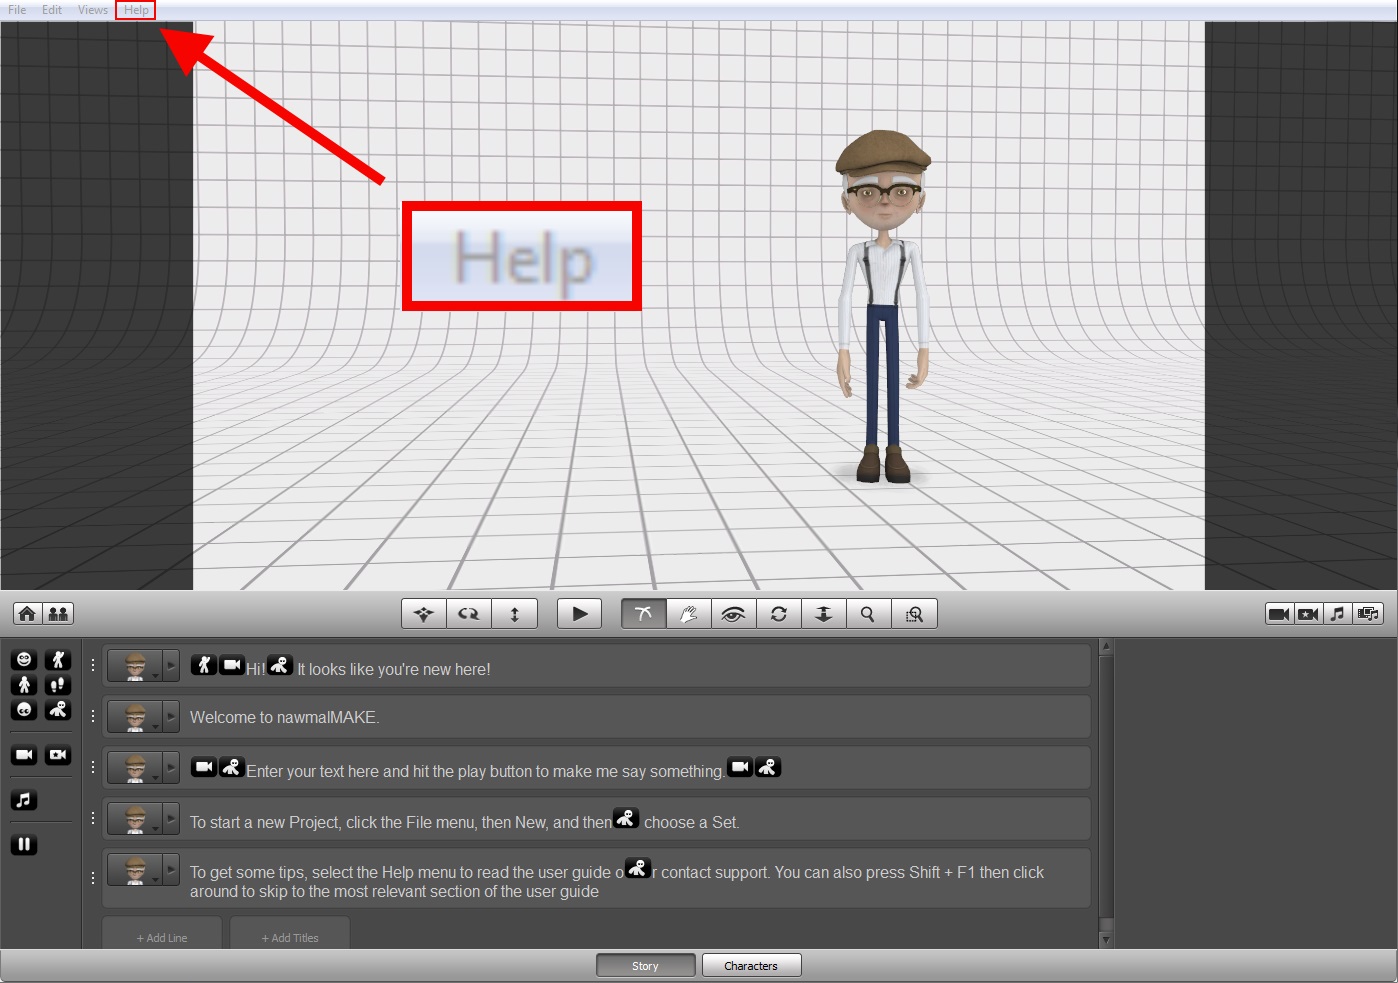
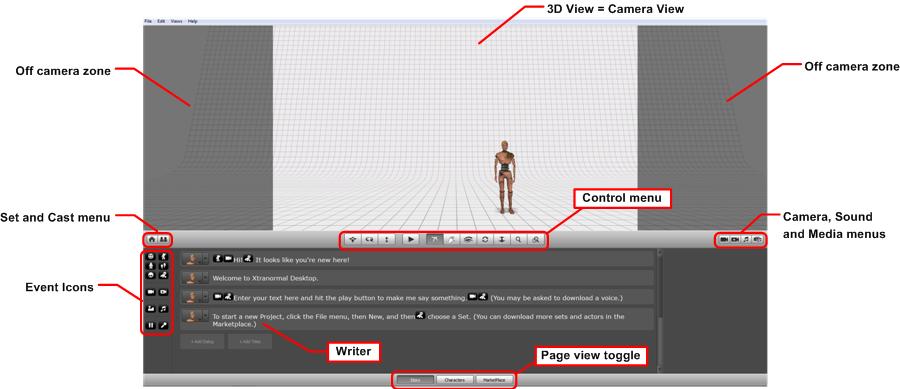
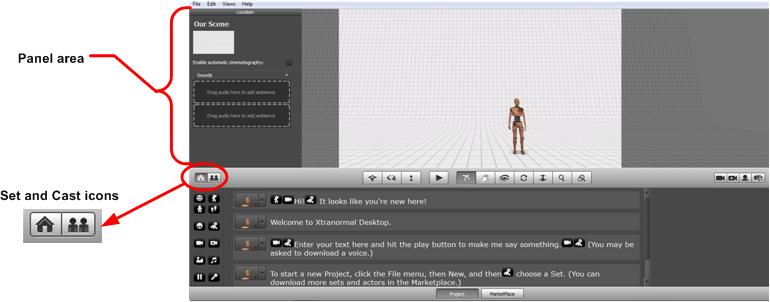
Upon login to , the main story screen will appear as below. This page has several important areas. The top half of the screen has the 3D view with shaded areas on either side that frame the camera visible area; which is the area seen in an exported video. The bottom half of the screen shows two different views: either the Story or the Characters. If your story has no characters then this bottom part of the screen will automatically show the character panel so that you can add characters to your story. The Writer is an area which contains easy-to-use animation controls and dialogue boxes for creating the story. The Writer is so simple that if you know how to send an instant message, you can create a story!
Jump to a specific section:
The 3D View is a window into the 3D environment with the characters in their initial positions. Characters can be added via drag-and-drop and they can be moved around the environment with simple tools The 3D view is also where a story is previewed before being exported as a video file. What you see in the 3D View during the preview is what will be seen in the exported video. This is because the 3D View represents the camera view. The default format of the 3D View is the widescreen format (16:9). The format can be changed but only while exporting a video, not while creating one. After changing the aspect ratio in the export video window, the 3D View will reflect the change by moving the shaded area of the 3DView. You can view this shaded area as see-through pillarbox or letterbox.
The view into the 3D environment can be changed in two ways: one is by switching between existing cameras (all sets have multiple default cameras plus any that you create); and second, by modifying the current camera view with the camera control tools.
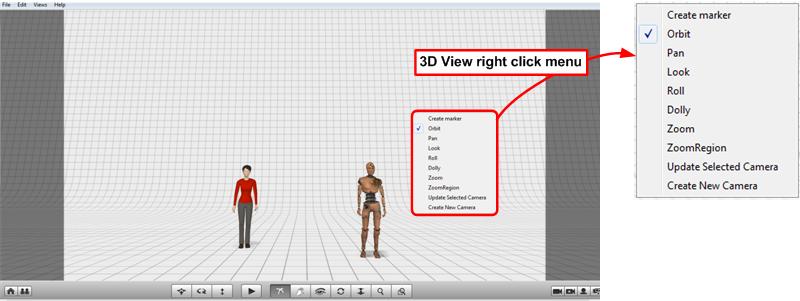
If you right click on the set (not on a character) a menu appears which allows you to access the camera manipulation tools or to create a marker. Markers are useful for walking or making a character look at a target. To see how to use the camera manipulation buttons, see here. The menu also allows you to update the selected camera (the current camera) or to create a new camera. For more on cameras, see the Smart Camera and the Static Camera sections.
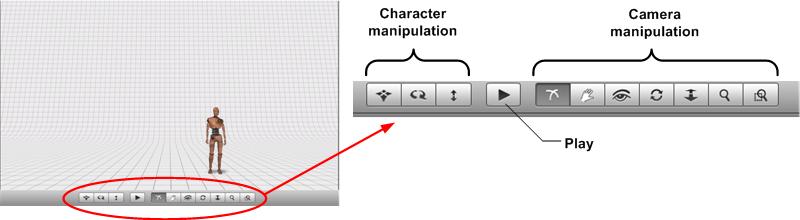
The control menu allows you to do three things: watch the story, modify the current camera view, or manipulate the characters within the 3D view.
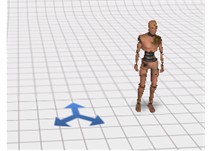
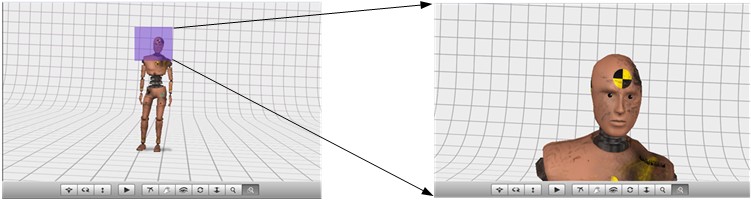
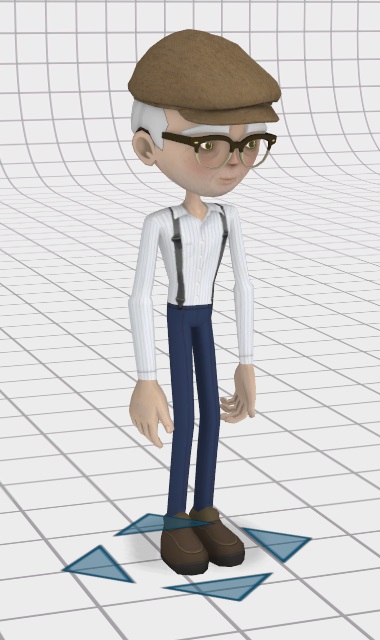 MOVE: This control allows a character to be horizontally manoeuvred around the 3D view. After selecting this button, move the cursor over the desired character and select it by holding down the mouse button. While holding the mouse button down, the character can be moved around the screen. The character is selected when the four arrows appear around the character’s feet (as shown in the figure below). The character typically moves on the ‘floor’ of the set; however due to the complexity of some sets, the ‘floor’ can be raised in some parts of the set, thus making it appear as if the character is jumping around. The Move tool can also be selected by right clicking the mouse while hovering over a character. [Shortcut: Ctrl + left mouse button]
 ROTATE: This control allows a character to be rotated around their central axis. After selecting this button, move the cursor over the desired character and select it by holding down the mouse button. While holding the mouse button down, the character can be rotated by moving the mouse. The character is selected when two twisting arrows appear around the character’s feet (as shown in the figure below). The Rotate tool can also be selected by right clicking the mouse while hovering over a character. [Shortcut: Ctrl + middle mouse button]
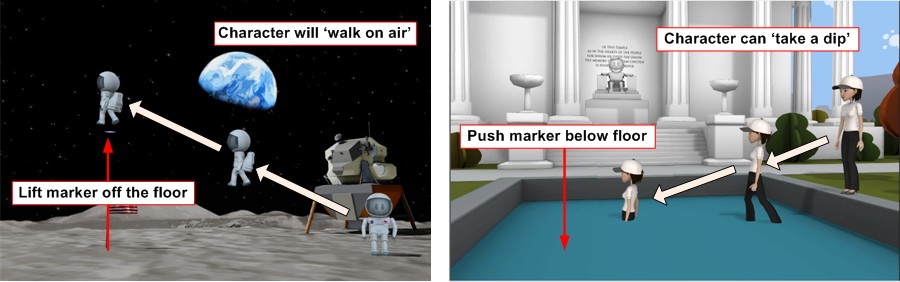
LIFT: This control allows a character to be vertically translated up and down their vertical axis in the 3D view. After selecting this button, move the cursor over the desired character and select it by holding down the mouse button. While holding the mouse button down, the character can be translated up or down along its central axis. Unlike horizontal and rotational translation, the character shows no outward sign of being selected. To return a character to the floor, right click on the character and select ‘Drop to the ground’. [Shortcut: Ctrl + right mouse button]
ROTATE: This control allows a character to be rotated around their central axis. After selecting this button, move the cursor over the desired character and select it by holding down the mouse button. While holding the mouse button down, the character can be rotated by moving the mouse. The character is selected when two twisting arrows appear around the character’s feet (as shown in the figure below). The Rotate tool can also be selected by right clicking the mouse while hovering over a character. [Shortcut: Ctrl + middle mouse button]
LIFT: This control allows a character to be vertically translated up and down their vertical axis in the 3D view. After selecting this button, move the cursor over the desired character and select it by holding down the mouse button. While holding the mouse button down, the character can be translated up or down along its central axis. Unlike horizontal and rotational translation, the character shows no outward sign of being selected. To return a character to the floor, right click on the character and select ‘Drop to the ground’. [Shortcut: Ctrl + right mouse button]The camera manipulation buttons are a set of tools that are used to put cameras in position around the 3D View. Note that there is a difference between camera manipulation in the 3D view and camera movement during playback of the story. The camera manipulation tools are used to move and position cameras in the 3D viewer during story creation. It is the camera Motion feature that can be used to create movement between cameras during playback. The Motion feature can be found in either the Static or Smart Cameras and can give the cameras very interesting motions from one shot to the next.
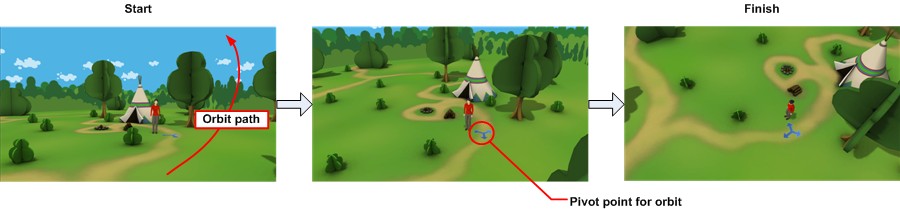
 ORBIT: This button allows the camera view to be orbited around a point in the 3D view. The point about which the camera is set to orbit is chosen by placing the cursor and holding down the left mouse button. While holding the left mouse button down, the camera view can be orbited by moving the mouse around. The point of rotation is denoted in the 3D view by three outgoing arrows as shown below. Orbiting is equivalent to the camera traveling along the surface of a 3D sphere where the center of the sphere is defined by the cursor. [Shortcut: Alt + left mouse button]

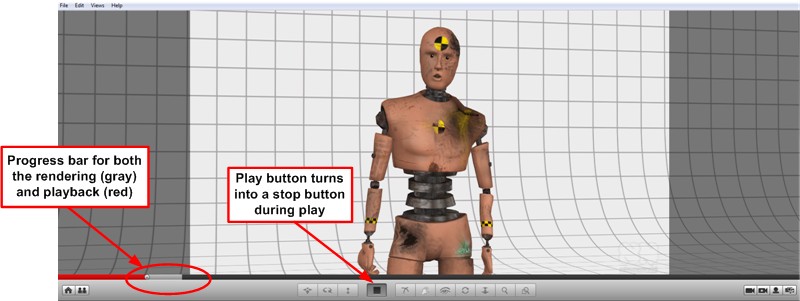
The play button runs the animation engine and renders a complete story with full video and audio. This preview is played in the 3D view window. During playback a progress bar appears across the bottom of the 3D View which shows the progress of the rendering and the playback. If you have made changes to a story the playback can lag the rendering depending on your computer’s rendering power. Note that during the playback the ‘play’ button changes to a ‘stop’ button to allow you to stop the preview at any point.
Exporting stories: Once you are satisfied with the look of your story it can be exported to an external video file. To export your story go to the File menu and select Export Video where you will find many exporting options available for both standard and high definition formats. The main choice is the type of video preset as this will determine the video codec used in the compression. Once you have chosen the preset, there will be a default set of values for the aspect ratio, resolution and bitrate. It is best to leave these defaults in place unless you are familiar with video encoding. However, if you choose to, you can override the defaults. For example the widescreen (16:9) format is the default aspect ratio for exported videos. However, you could change that on export to a standard 4:3 TV ratio.
Another interesting output preset choice is Individual Frames which will output every single frame of the movie as an individual PNG image. Be careful, as there are 25 frames per second the total number of images will be quite large even for a short story.
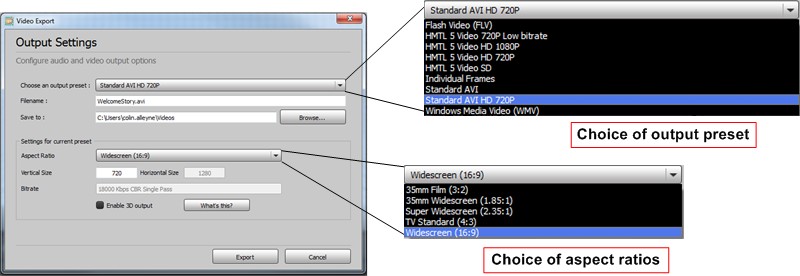
3D Video: nawmalMAKE allows you to export movies in stereoscopic 3D. All you have to do is choose the 'Enable 3D output' option and the video will have a stereoscopic 3D output format. Stereoscopic 3D is where there are two slightly offset images presented to each eye giving the illusion of depth. By choosing the 3D output, the video will have both the left and right images required for 3D compressed into the same frame, side by side. To allow for the side-by-side layout the horizontal resolution in each image has been reduced by half.
Once you have exported a stereo 3D video, you can use it in several ways. One of them is to upload it to a 3D enabled TV since most current 3D TVs have the option of displaying 3D videos with side-by-side (or left-right) video layouts as provided by nawmalMAKE. Uploading to you tube
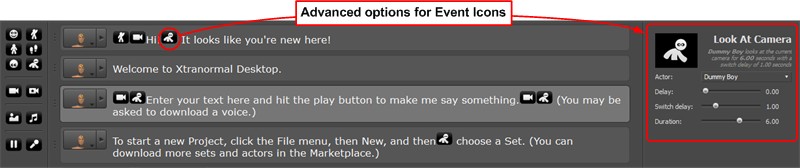
The writer occupies the bottom half of the screen and is the tool used to write the dialogue and control the action within a story. It is divided into three areas: at the left is a menu with drag-and-drop Event Icons, in the center are the dialogue boxes filled with dialogue and Event Icons, and at the bottom are buttons for adding a new dialogue box or adding titles.
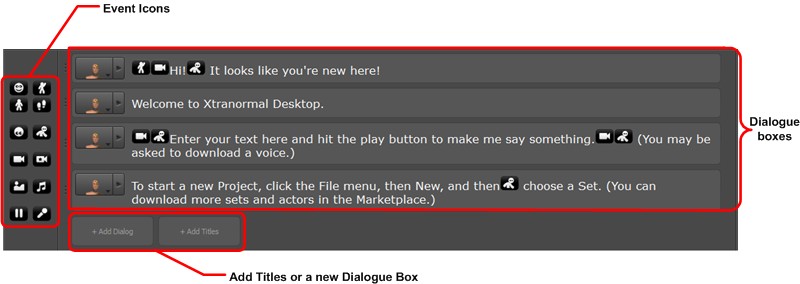
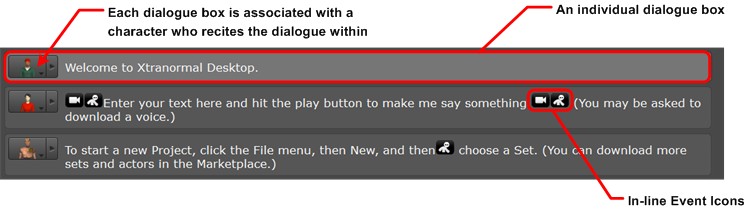
Each individual dialogue box is linked to a character in the scene; the specific character is shown in the thumbnail image on the left side of each box. The text within a dialogue box will be spoken by the corresponding character when the play button is pressed. It is important to note however that although the dialogue is linked exclusively with the character on the left side of the box, the Event Icons are not necessarily linked to that same character; they can be linked to other characters or objects (such as cameras). This is to allow multiple characters to gesture or move at the same time regardless of whether they are speaking. To see how this is possible see the section on Drag-and-Drop Event Icons.
Timing: The dialogue is used as a proxy for the timeline of the story and so Event Icons that appear within the dialogue are activated in time with the dialogue. In other words the action represented by the Event Icon is executed at the moment when the character finishes speaking the word that appears before the icon. The exact timing can be modified slightly by using ‘delays’ that are built into the Event Icons since a delay allows the execution of the Event Icon to be offset by several seconds. Some Event Icons also have durations which can be modified, meaning that the length of time during which the Event Icon is active can by changed.
Drag-and-Drop: Event Icons are placed in the dialogue box via a simple drag-and-drop.
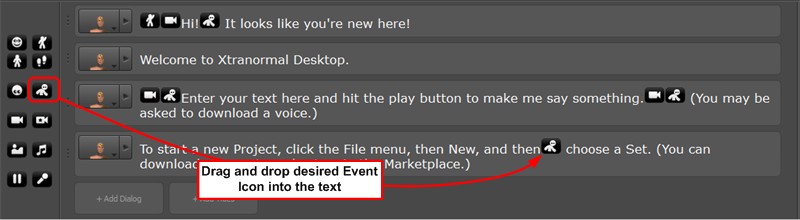
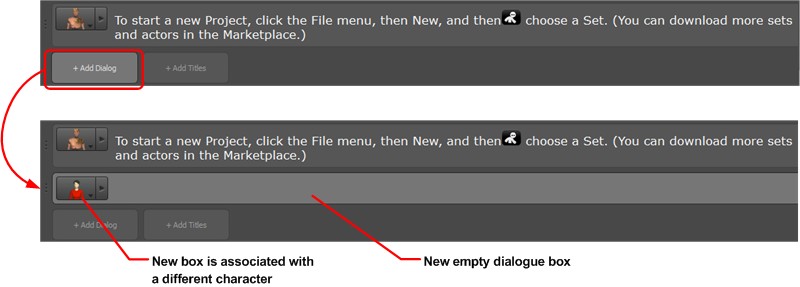
Adding Dialogue Boxes: Extending the dialogue can be done by adding dialogue boxes. Adding new dialogue boxes is easy and can be done in two ways: first, simply press return while the cursor is in a dialogue box and a new empty box will appear below it. This is a quick way to create an empty dialogue box in the middle of the stack. The second way to get a new dialogue box is to click on the ‘+ Add Line’ button at the bottom of the Writer. Note that the ‘+ Add Line’ button puts the new empty dialogue box at the end of the dialogue. When there are more than one character in the cast the new box will be associated with a different character; the new boxes will cycle between the characters to simulate a conversation where everyone speaks in turn.
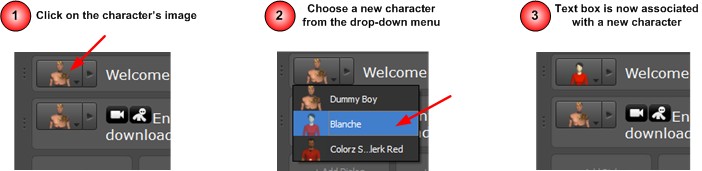
Changing the speaker: The character linked to a dialogue box can be changed by clicking on the character’s image and selecting a new character from the drop down menu. The available characters will only be those that have been brought into the story and are therefore part of the cast.
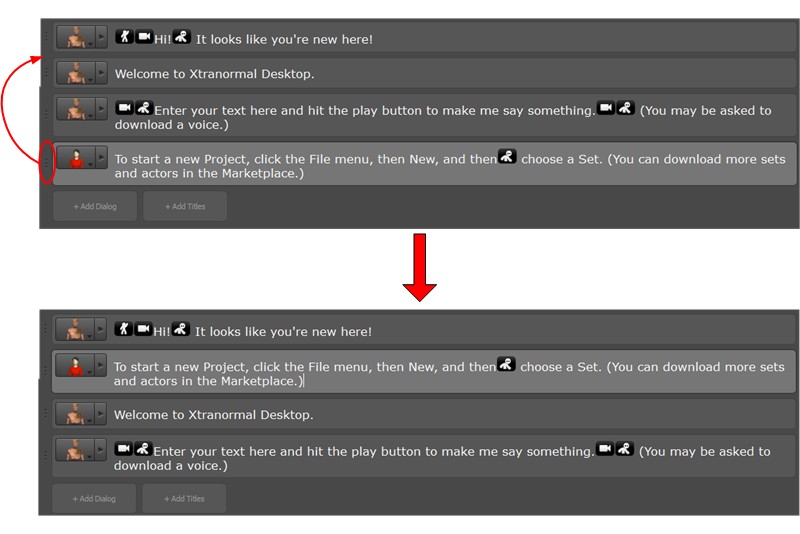
Rearranging dialogue boxes: Dialogue boxes can be rearranged by simply grabbing them via the grab icon to the left of the character image ![]() and moving the box up or down in the stack. The mouse changes to a hand as the mouse is passed over the grab target.
and moving the box up or down in the stack. The mouse changes to a hand as the mouse is passed over the grab target.
Adding Titles: Titles can be easily added to your story by clicking on the ‘+Add Titles’ button. This will add a Title box to the bottom of the dialogue. The text you type in the box will be the title. A special Title menu appears to the right of the Writer. This menu allows you to control the properties of the text such as the font type, size, colour and opacity. You can also control the text background colour and opacity. The Title can be made stationary or can be made to scroll up or down on the screen. Use the ‘Duration’ feature to control how long the Title is visible; note that this will control the scrolling speed if scrolling is chosen. The scrolling option can be used to make story credits.
The drag-and-drop Event Icons allow you to insert controls directly into the dialogue. These Event Icons control elements of the characters (gestures, movements and facial expressions), as well as camera action (via Smart and Static Cameras), and also add effects such as sound effects and photo inlays. When an Event Icon is placed in the dialogue it represents an event which will be triggered when the dialogue reaches that point. Each of the Event Icons has an associated ‘Event Inspector’ which appears to the right of the Writer when an Event Icon is placed in the dialogue or when you click on an Event Icon. Each Event Inspector allows you to control the actions of the Event Icon it is linked to. Each Event Inspector is specific to the given event, however many of them share common traits such as drop down menus to select the target of the Event Icon (e.g. who will perform a walk) and the target of the action (e.g. destination of the walk). Each Event Inspector also has an advanced menu with additional features specific to the given event. There is also a text summary that describes the event; the modified elements are highlighted in bold font.
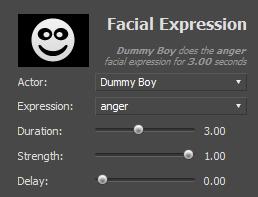
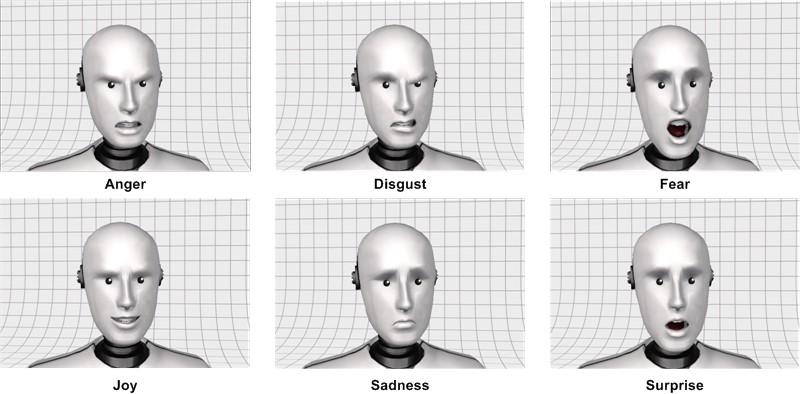
The first drop down item on this menu allows the Facial Expression Event Icon to be targeted to a specific character in the cast. The second item is a list of the type of facial expressions that can be applied. There are six types of facial expression, namely: Anger, Disgust, Fear, Joy, Sadness and Surprise.
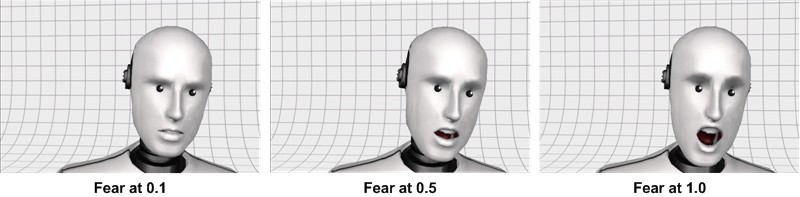
The Advanced portion of the drop down menu allows the Duration, Strength and Delay to be modified by sliders (or you can type the values directly into the text field). The Duration determines how long the character will hold the facial expression and it can be anywhere between 0 and 60 seconds; with 3 seconds being the default. The Strength modifies how intensely the character performs the facial expression; a value of 1 is the default and it creates the most obvious expression. The Delay is the amount of seconds that elapse before the beginning of the facial expression. The delay can be between 0 and 60 seconds, which is sometimes useful when a facial expression needs to be offset from the dialogue; such as to create a moment of silence before a character shows a reaction.
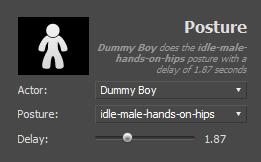
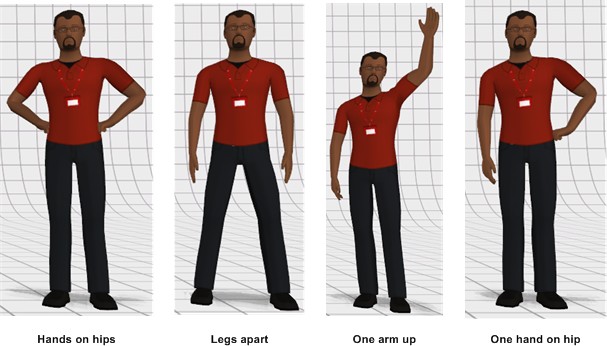
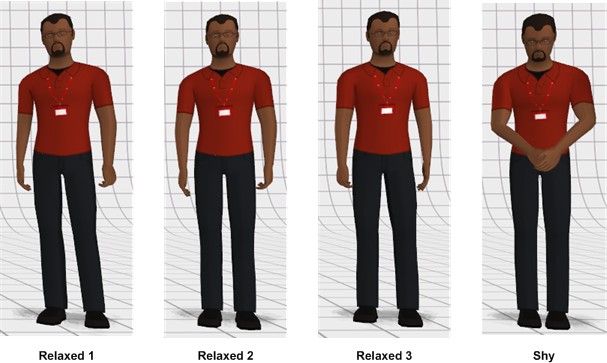
Note that postures are not static, there is a small amount of animation to simulate the small movements that people make when standing still. There are currently 8 available postures shown below:
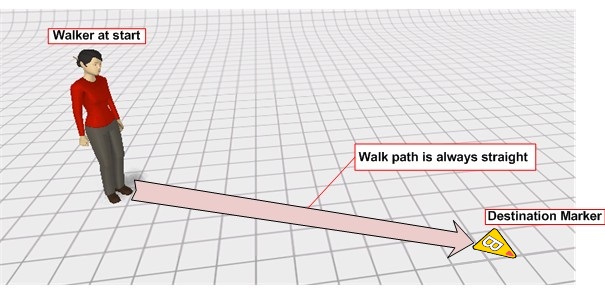
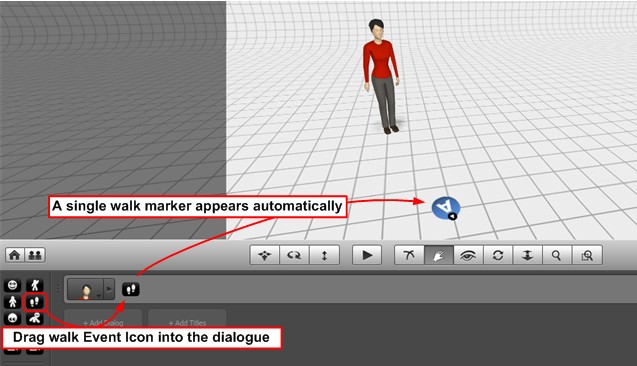
Markers and the Event Inspector: One marker is automatically placed in the scene every time a walk Event Icon is placed in the dialogue. This first marker is placed a short distance in front of the character and so you may have to back the camera up to see it. The Walk Event Inspector is also opened when a walk Event Icon is dragged into the dialogue or when you click on a walk icon. The Event Inspector can help you control aspects of the walk such as changing the walker and choosing the 'Target' marker (i.e. the final destination of the walk).
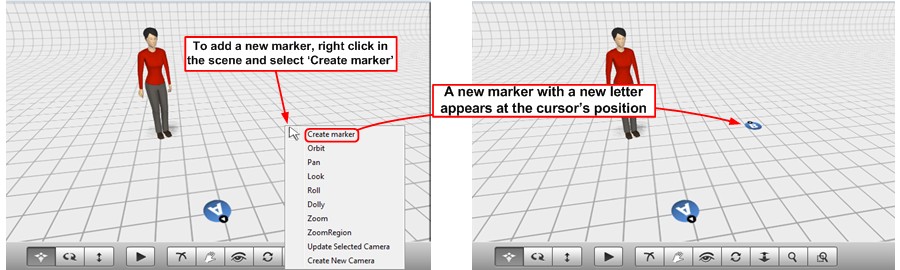
Adding more markers: Additional markers can be added to the scene by right-clicking in the 3D view and selecting ‘Create Marker’. A new marker is then created underneath the cursor position. Markers are labeled with letters to distinguish different destinations, although multiple characters can walk to the same marker (but beware, they will all overlap and occupy the same space at the destination).
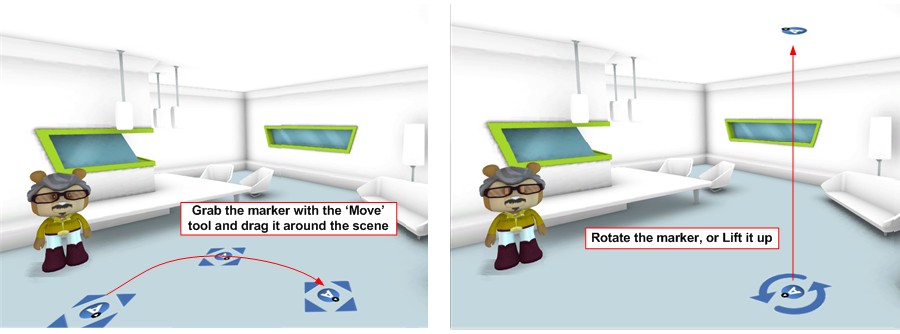
Manipulating markers: The markers are considered objects and therefore they can be moved with the same tools as characters; namely the Move, Rotation and Lift tools. These three tools allow you to do some interesting things: First, and most obvious, the Move tool allows you to move the marker and direct the walk to any location on the set floor. Second, the Lift tool allows you to make some magic. Using this tool the destination marker can be lifted above or dropped below the floor causing the character to appear to walk on air or walk through the floor. Finally, the Rotation tool allows you to rotate the destination marker, and this will cause the character to rotate in that direction at the end of the walk.
Using your imagination you can make some interesting things happen.
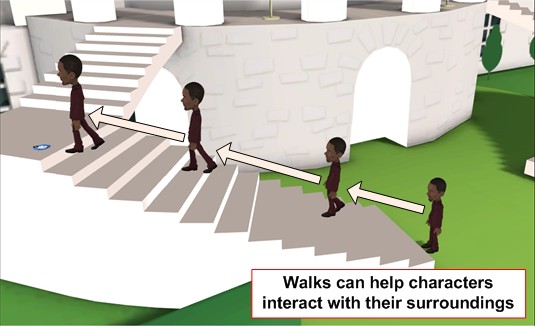
Some of the sets have steps built into them. You can use the walks to interact with the environment.
Walk timing: There are a few other important aspects such as timing, sequence and gazes that must be taken into account in order to have good results with walks. With respect to timing keep in mind that walks are not interrupted, meaning that once a walk is initiated it will go to completion. This is very important for the timing of the action within a story since it can easily take longer to walk to a destination than it does to speak the dialogue. This can lead to a situation where a character is walking long after the dialogue has ended, making for potentially awkward flow. Conversely, if the walk ends too early you can apply up to 60 seconds of delay to push back the start of the walk.
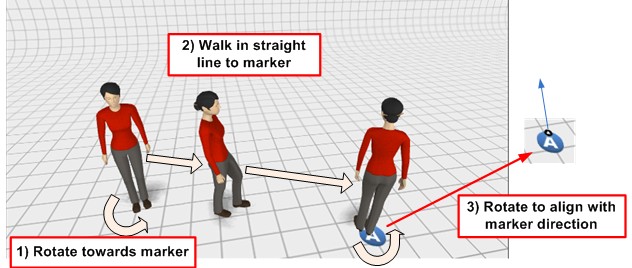
Walk sequence: It is also important to be familiar with the following three steps of the walk sequence; particularly with respect to rotation. Unwanted rotations in the character's movement can be eliminated by remembering this sequence.
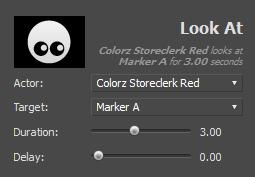
Character gaze while walking: A walking character will automatically look at another character that is speaking as long as the speaker is ‘in front’ of the walker (being ‘in front’ from the perspective of the walker), otherwise the walker will look at the target marker. This can create a situation where a character is looking sideways at the speaker while walking forward. This may be desirable, however the automated gaze of a character during a walk can be overridden by using either the ‘Look at camera’ or the ‘Look at target’ controls to specify other targets for the character's gaze. Note that if the speaker is also walking, the walker will adjust their gaze to follow the moving speaker as long as the speaker remains in front of the walker.


The Event Inspector allows you to cut to any of the available Static Cameras. Clicking on the arrows next to the thumbnail image in the Event Inspector causes all the available camera thumbnails to become visible. You simply have to click on the desired thumbnail to select the camera you want to cut to.
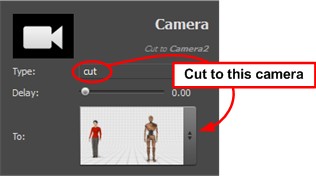
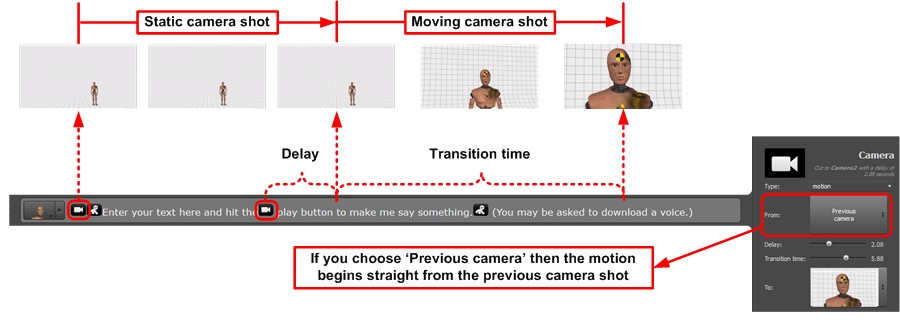
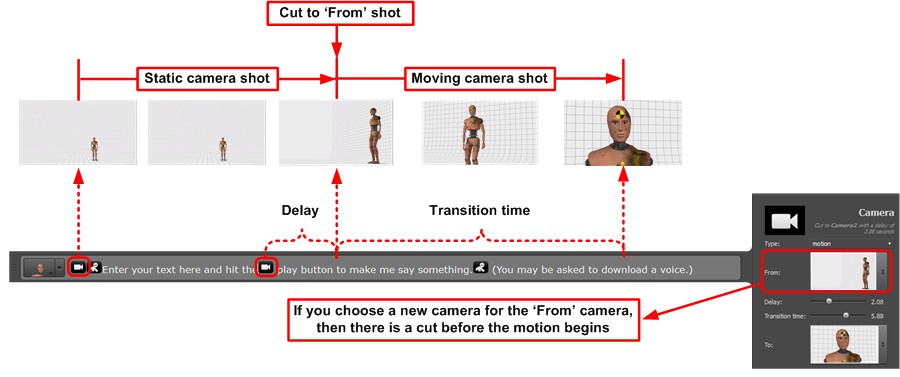
There are two aspects of a Static Camera that can be controlled in the Event Inspector; namely, the delay and transition time. The delay determines the amount of delay in seconds (from the Event Icon’s position in the dialogue) before the camera view switches. The transition time is associated with the Motion feature and is the amount of time it takes to transition (move) between the two cameras. A short time means a fast transition and a long time means a slow transition.
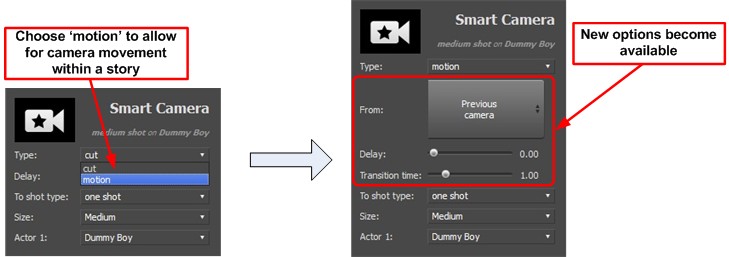
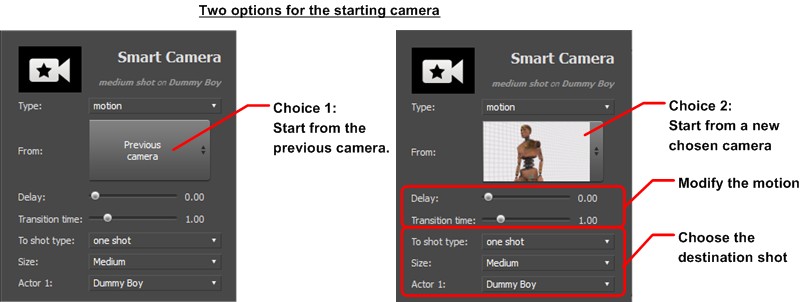
Motion: The Motion feature is a way of bringing camera movement into your story, which can help it feel more dynamic and natural. To use the Motion feature, you have to choose ‘Motion’ for the type of shot in the Event Inspector.
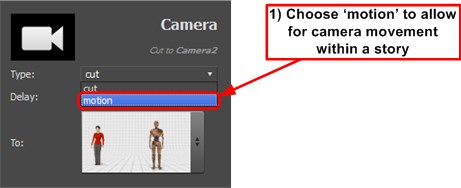
When you choose ‘Motion’, the Event Inspector changes to show source and destination cameras so that there is a ‘From’ camera and a ‘To’ camera. The transition time (which also becomes available when ‘Motion’ is chosen) determines the amount of time it takes to transition between the ‘From’ and ‘To’ camera shots. There are two choices for the ‘From’ camera and each choice leads to a different effect: First, you can transition from the 'Previous camera' (meaning the previously active camera); or you can insert a new camera shot at the beginning of the motion.
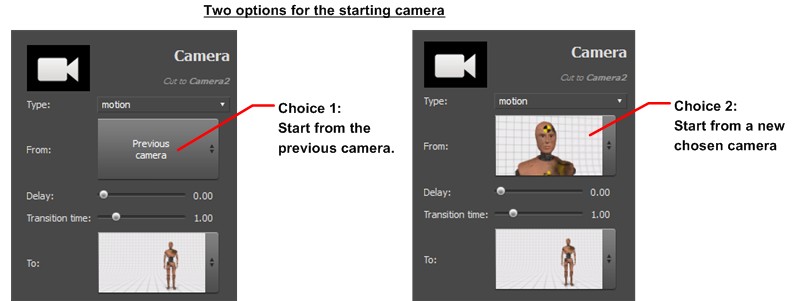
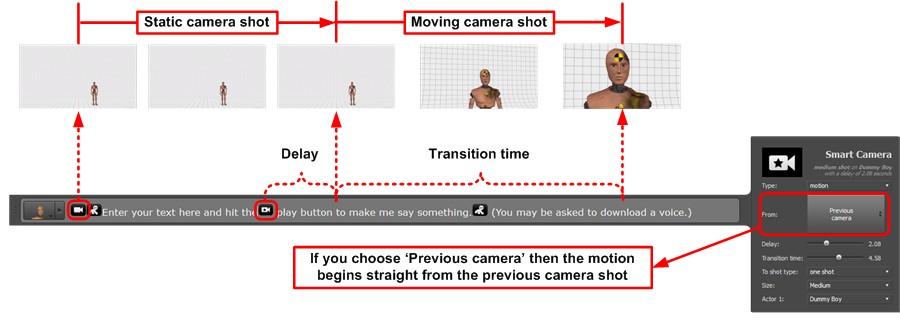
Motion from 'Previous camera': When selecting this option, the camera motion begins from the camera shot that was active prior to the inserted icon.
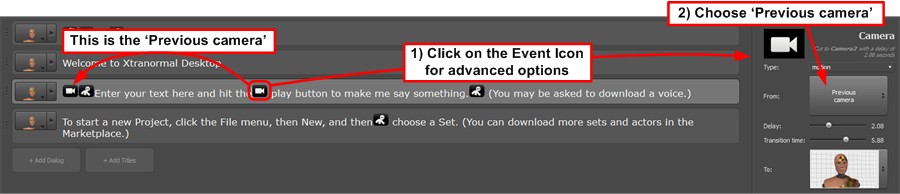
When transitioning from the 'Previous camera' there is a smooth transition towards the ‘To’ camera. The timing is such that the shot from the previous camera holds until the end of the delay specified in the Even Inspector. After the delay the camera motion begins with the previous shot and has a smooth transition to the destination shot.
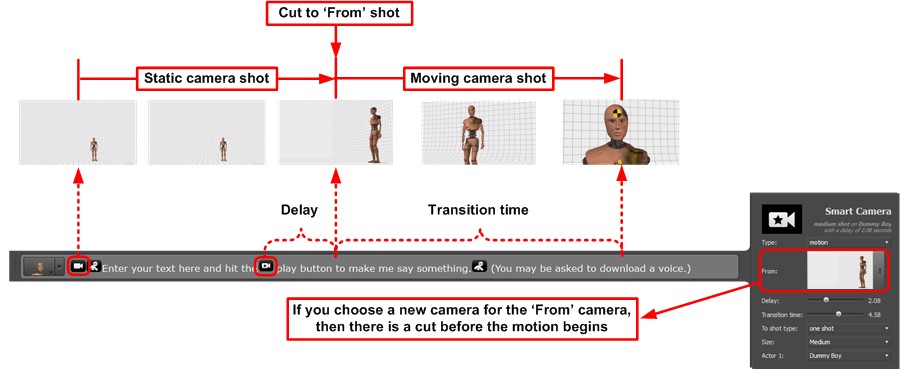
Transition from a new camera: The second option for the ‘From’ camera is to select a another Static Camera. This option will insert a simple cut to a new camera shot before the motion begins. So with this second option, there will be an abrupt cut from the Previous Camera to the ‘From’ camera followed by a smooth transition to the destination ‘To’ camera.
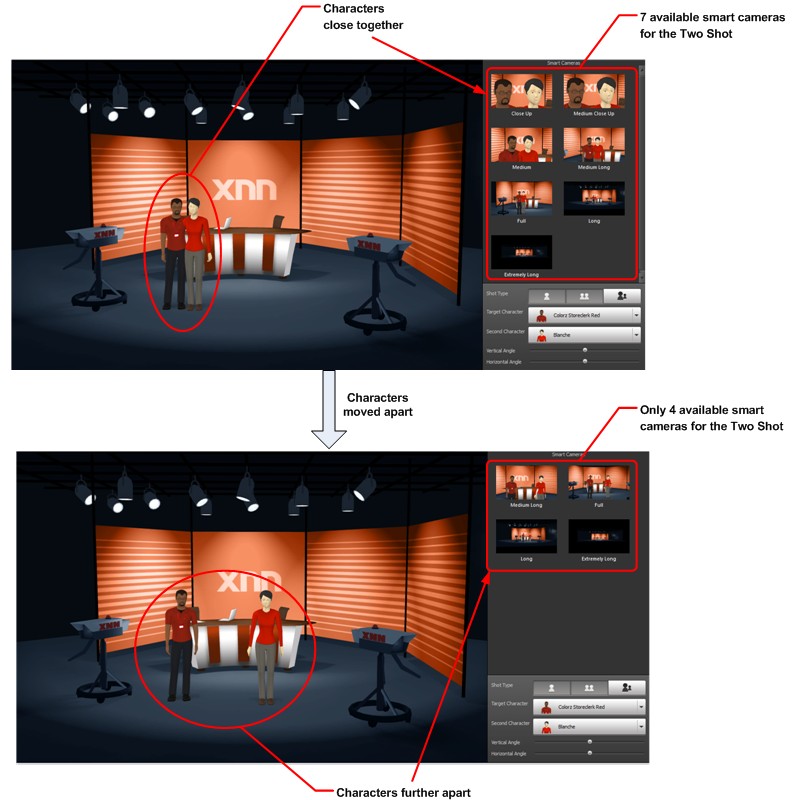
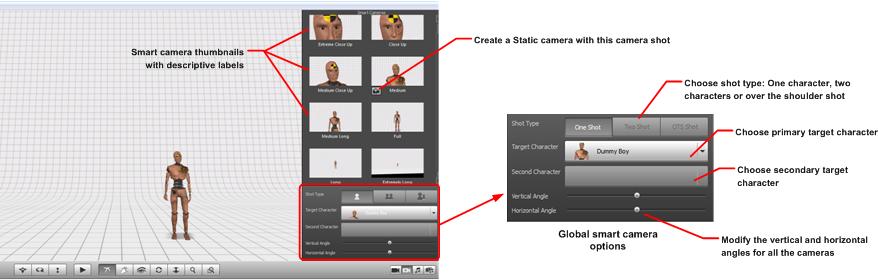
These shot types can be chosen for three different frame types; namely a ‘one shot’, ‘two shot’ or ‘over the shoulder’. The ‘one shot’ is a framing where one single character is framed for the chosen shot type. The ‘two shot’ is framed so that two characters are within the desired shot. The over the shoulder shot is framed so that the camera is over the shoulder of one character and looking towards another character.
Smart Cameras are considered smart because they move within the 3D scene in such a way as to maintain a shot type even when the characters are moved in the 3D View. Therefore, the number of available Smart Cameras will be dynamically reduced if the desired shot is not possible. For example if a two shot is selected, then the characters need to be close enough together to allow for a close shot that contains both characters; otherwise the camera will not exist. The Smart Cameras come in and out of existence dynamically as the characters are moved around.
Motion: The Motion feature is a way of bringing camera movement into your story, which can help it feel more dynamic and natural. To use the Motion feature, you have to choose ‘Motion’ for the type of shot in the Event Inspector.
When you choose ‘Motion’, the Event Inspector changes to show source and destination cameras so that there is a ‘From’ camera and a ‘To’ camera. The transition time (which also becomes available when ‘Motion’ is chosen) determines the amount of time it takes to transition between the ‘From’ and ‘To’ camera shots. The 'Delay' is the amount of time in seconds before the motion begins. There are two choices for the ‘From’ camera and each choice leads to a different effect: First, you can transition from the 'Previous camera' (meaning the previously active camera); or you can insert a new camera shot at the beginning of the motion.
Motion from 'Previous camera': When selecting this option, the camera motion begins from the camera shot that was active prior to the icon in the dialogue. With this choice there is a smooth transition from this Previous Camera towards the ‘To’ camera. The timing is such that the shot from the previous camera holds until the end of the delay specified in the Event Inspector. After the delay the camera motion begins with the previous shot and has a smooth transition to the destination shot.
Transition from a new camera: The second option for the ‘From’ camera is to select another existing Static Camera as the initial camera. So with this second option, there will be an abrupt camera cut from the Previous Camera to the ‘From’ camera followed by a smooth transition to the destination camera.
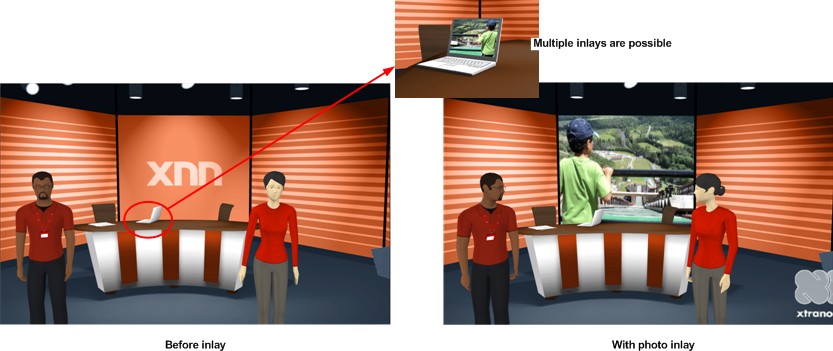
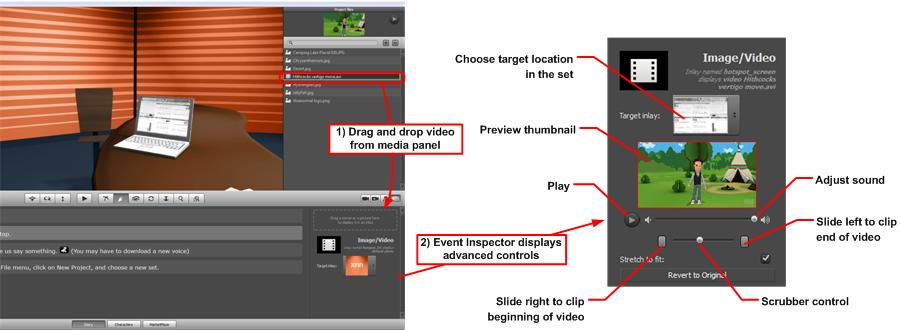
Inlaying photos: The supported formats for photos are PNG and JPEG. The advanced menu provides the option of allowing the picture to be stretched to fit the photo inlay dimensions if the height/width ratio does not match. Note that for photos only, if you wish to have an image remain permanently displayed throughout a story then the inlay should be placed within the Set panel and not with the Photo Inlay Event Icon.

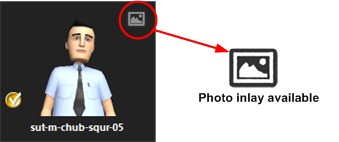
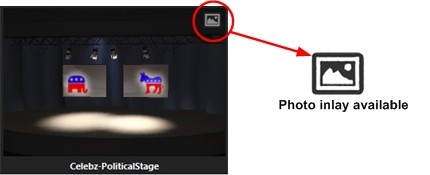
Not every set supports inlays; the sets that do are displayed with an inlay icon. Some sets have multiple hot spots allowing for multiple inlays. The target hot spot for the inlay can be chosen within the Event Inspector.
Inlaying videos: The supported formats for videos are the following: AVI, MPG, MOV, WEBM and MKV. When a video is dragged into the Event Inspector an advanced menu is displayed. This menu allows you to shorten the video by clipping either the beginning or the end of the video using two sliders. A circular knob between the two sliders can be dragged back and forth for scrubbing (i.e. to show preview thumbnails for different moments in the film) to locate appropriate moments for clipping. A play button is also included to allow you to preview the exact video that will be played. There is also a sound bar to control the level of the sound for the video during playback.
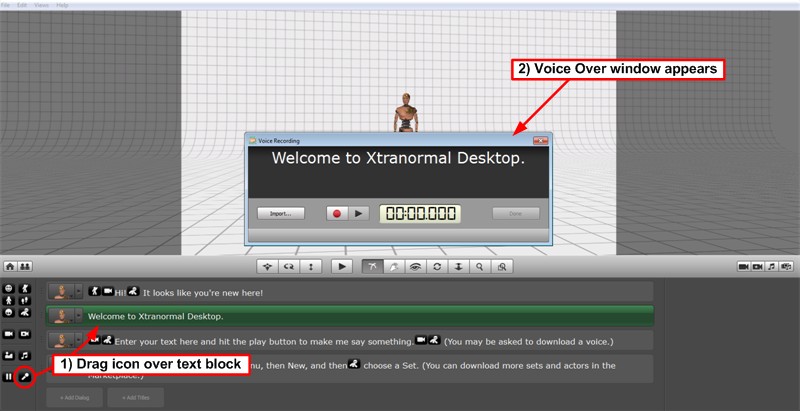
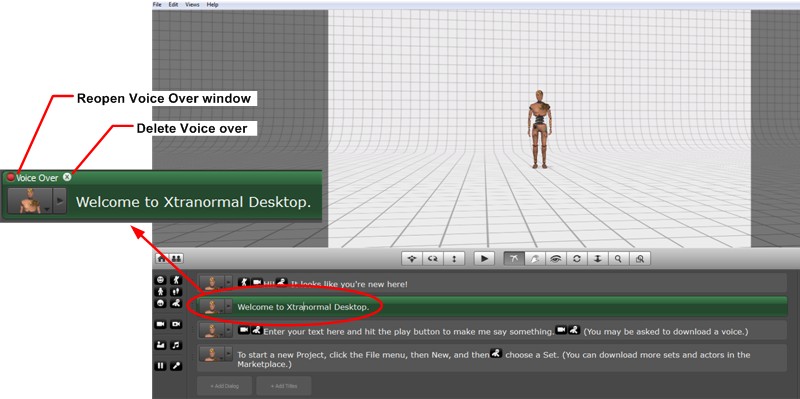
Once a recording is complete you can click on 'Next Block' to record the next line of dialogue without leaving the window; or, if you are finished recording, you can click on ‘Done’ to exit the window. The voice recorded dialogue lines are specially marked in the Writer to differentiate them from the default Text-to-Speech lines. The Voice Recording lines remain highlighted in green and with a red circle denoting the Voice Over recording above the character’s image. Simply click the Voice Recording button again to reopen the Voice Over window and rerecord (or re-import) if desired. You can delete the Voice Over with the delete button next to the Voice Recording notice. Deleting the Voice Over reverts the line back to Text-to-Speech. Note that the Voice Over feature cannot be used for part of a line, but must be used for its entirety block. If you wish to segment a speech such that part of the speech is TTS and part is Voice Recording, then you must divide the speech into several dialogue lines.
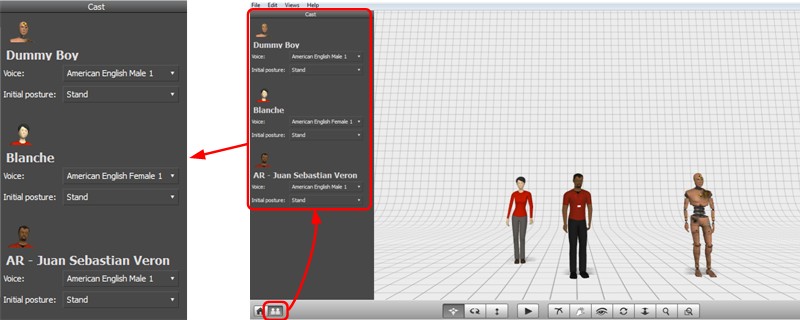
The set and cast panels display the available sets and characters that can be added to a story. The area to the left of the 3D view is where the information is displayed.
Clicking on the cast button opens a panel with a list of the cast members in the current story (to add cast members to a story use the Character Panel). The Cast Panel displays two settings for each character: the voice and stance. There is a drop down menu for the character’s voice, and there is a drop down menu for the initial stance of the character; which can be either standing or sitting. Note that the voices seen in the drop down menu are only those that have been installed. Use the ‘Get more voices’ button to choose and install new voices. The voice chosen in the cast panel is the one that will be used by the Text-to-Speech (TTS) system to recite the dialogue in the dialogue lines linked to each character in the Writer. The TTS system is always the default for reciting the text in a dialogue line; however, these TTS voices can be overridden by you via the Voice Recording feature.
Character inlays: Certain special cast members can have image inlays on certain parts of their bodies. This is useful for placing company logos and the like. Only some characters have this ability. Characters with this special ability are denoted in the Character Selector with a small inlay icon next to their thumbnail. The cast panel for these special characters is slightly different in that it has an area with where the inlay images can be drag-and-dropped from the Media Library. Each area in the logo drop down menu represents an area on the character such as back, tie, R chest, etc. Note that not all characters have the same inlay areas.
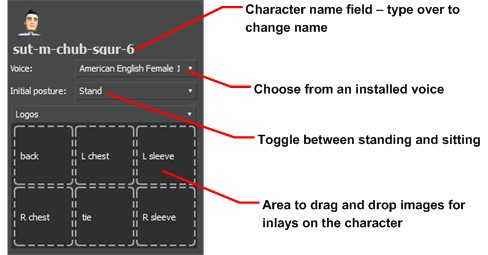
To add inlays to a character, simply drag-and-drop images from the Media Library into the appropriate drop down logo menu area in the Cast Panel.

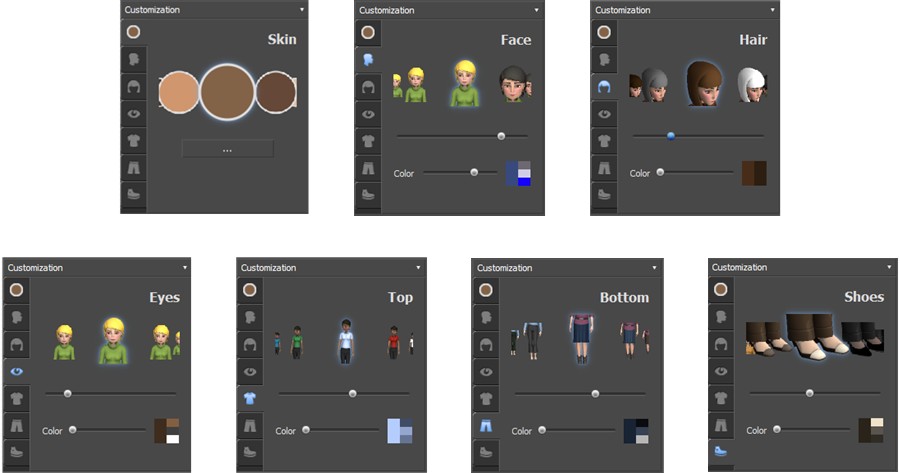
Character customization: Beyond just inlays, the Suits collection is even more customizable. Several aspects of the characters can be modified, including: the colour and type of clothing, the colour of skin and makeup, the hair style and colour, and the type of shoes.
To access character customization, simply drag-and-drop a Suits character into a scene and open up the Cast Menu. Within the Cast Menu you will find the ‘Customization’ drop down menu. There are six tabs in the Customization menu for non-business accounts that link to the following aspects of the character: Face (i.e. makeup), Hair, Eyes, top, bottom and Shoes.
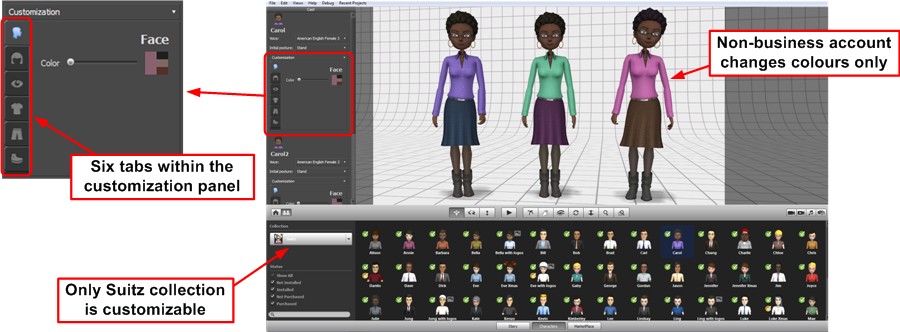
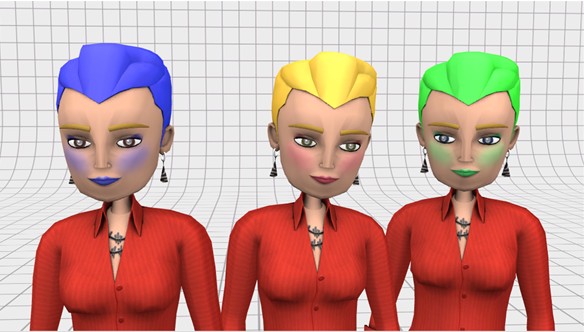
Note that it is the hue of the colour that changes, so the effect is much greater with bright, saturated colours. To maximize the effect, you can choose characters that are initially very colourful. Also note that the customization works for makeup as well, which is also more prominent on fairer skin. We can see the effects of bright colours and fair skin in the following image. Although the makeup and hair colour match in this example, they can be independently coloured.
There is an additional tab that controls the skin colour and you also have the ability to change the shape of clothing, hair and sometimes even the shape of the face depending on the character. Each of the tabs has an additional roulette feature that allows you to control the shape of the feature associated with the tab. The following image shows all the tabs for the business account.
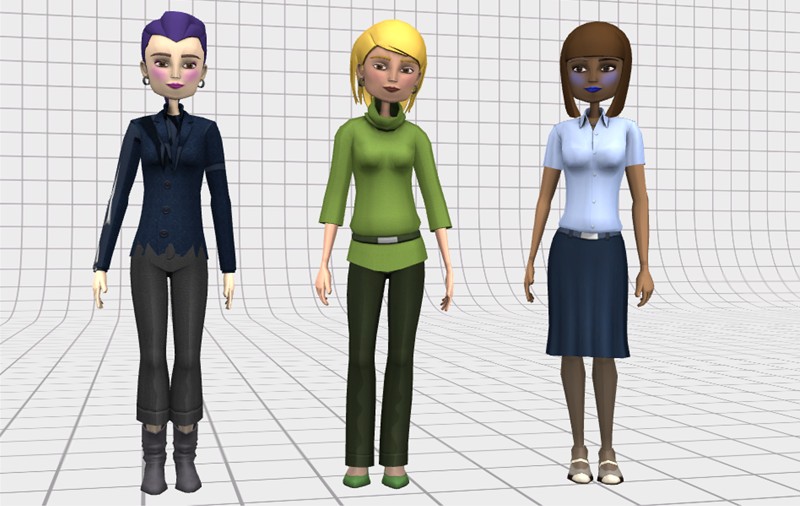
Using these features you can radically change a character to create any personality that you wanted. The following image demonstrates just how much the center character (no customization) can be altered.
Changing character parameters: Some character parameters can be changed via the character’s right click menu. To access this menu, simply use the mouse’s right click button while the cursor is over the character. This menu allows you to do several simple things:
Drop to the ground: This is used to place the character back on the set’s floor which is useful if you have used the Lift tool to move a character vertically.
Remove character: Select this to remove a character.
Move :This links you to the Move tool. Select this to move the character around the scene.
Rotate :This links you to the Rotate tool. Select this to rotate the character.
Lift :This links you to the Lift tool. Select this to lift the character above or below the set’s floor.
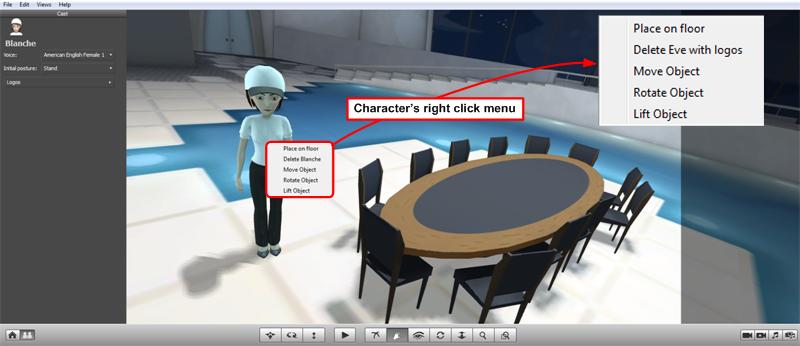
Other character parameter. Changing some of the character’s parameters such as the name, the voice, initial posture and inlays must be done from within the cast panel.
Clicking on the set button opens a panel that shows the options related to the set. In this panel there are three aspects of the scene which can be controlled: automatic camera cuts, photo inlays and background sound effects (ambiance).
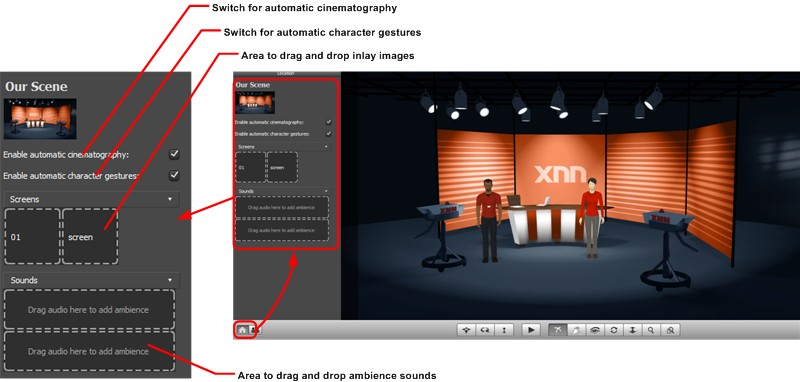
Automatic Cinematography: The panel contains a switch to enable automatic cinematography. This feature engages an automatic cinematography engine that controls the camera action. With this feature enabled, you do not have to add any camera cuts directly into the dialogue; instead will automatically switch from shot to shot using a standard cinematography style. It is important to note that this feature will not place cameras for you, rather it selects the best camera shots from the available Static Cameras. The Static Cameras can be used to help improve the results by placing them in appropriate locations to properly frame the characters; or alternatively, the Smart Cameras (which automatically frame the characters) can be used to create properly framed Static Cameras (see Smart Cameras for more details). This is a useful feature for users who don’t want to spend time controlling cameras. For those interested in advanced yet easy to implement camera tricks see the section on cinematography.
When automatic cinematography is enabled it remains enabled for the entire scene except for any dialogue block that contains a camera Event Icon. Adding a camera Event Icon in the dialogue will override the cinematography engine for the entire block regardless of the position of the camera Event Icon in the dialogue. After the block containing the camera Event Icon, the automatic cinematography feature will reengage.
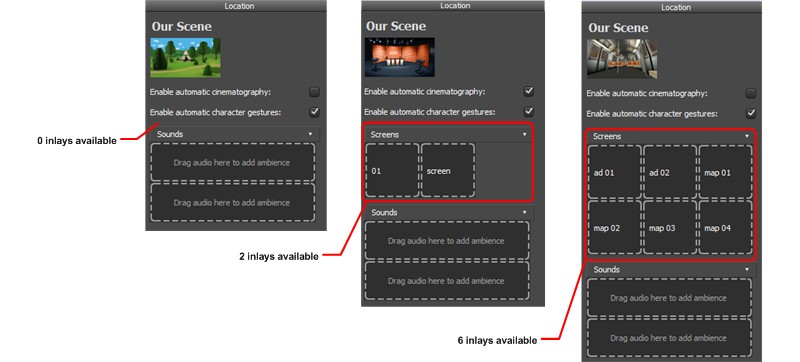
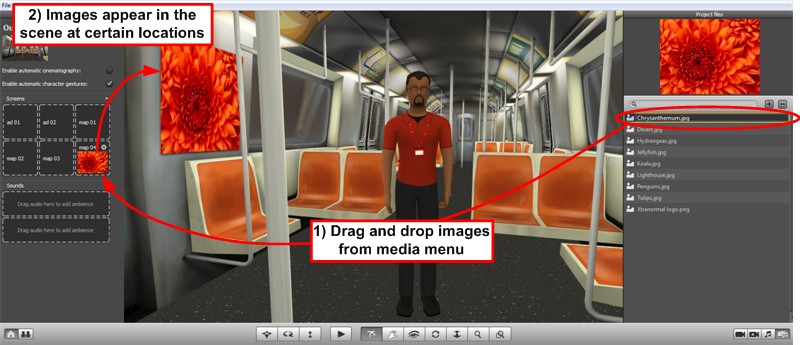
Set Inlays: This panel also has an area for embedding images in the various inlays in the set. The drop down ‘Screens’ menu will show all the inlay screens available for the current set. Images can be dragged and dropped onto these screens from the Media library. Only sets that have the inlay capability will have the Screens drop down menu available. Sets that that have inlay capability are marked with a inlay icon in the set selection window. As we can see in the image below, some sets have only a few screens while others have many.
When an image is dragged and dropped into a Screen that image becomes part of the set for the entire duration of the story. If you wish to have the image change during the story, then the Inlay Event Icon must be used instead as this can control when an image appears in the scene.
Ambiance: The ‘Sounds’ area in the panel is an area where ambiance music can be dragged and dropped. Many different sounds for the ambiance music can be found in the Sound Panel . You can also import sound files to add to the Media Panel so that they can be used for customized ambiance music.
The menu on the right side of the screen is used to display the different camera views and manage the available media (sound, images and video). A panel appears to the right of the 3D view when any of the buttons are selected.
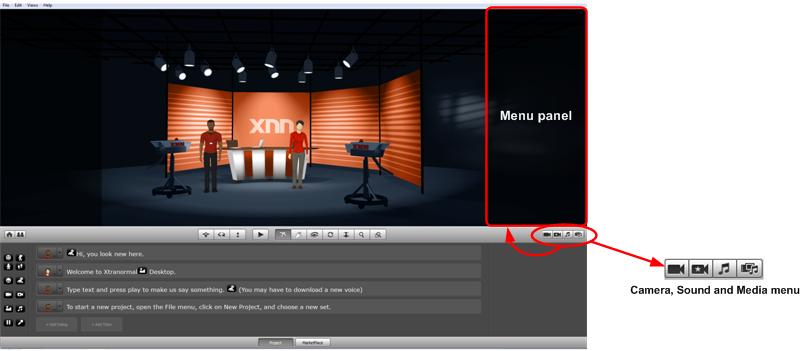
There are two camera buttons in this menu; one for Static Cameras ![]() and another for Smart Cameras
and another for Smart Cameras ![]() . The Static Cameras are fixed at a particular point in 3D space within the 3D environment. They do not move or adapt to anything. By contrast, the Smart Cameras are set to capture a given type of shot on a given target and therefore they adapt to changes within the 3D environment (such as character movement). For example, a Smart Camera can be set to have a Medium shot on a specific character. If that character is moved within the 3D scene, the camera will follow
the character to maintain the medium shot. Static Cameras do not follow character movement.
. The Static Cameras are fixed at a particular point in 3D space within the 3D environment. They do not move or adapt to anything. By contrast, the Smart Cameras are set to capture a given type of shot on a given target and therefore they adapt to changes within the 3D environment (such as character movement). For example, a Smart Camera can be set to have a Medium shot on a specific character. If that character is moved within the 3D scene, the camera will follow
the character to maintain the medium shot. Static Cameras do not follow character movement.

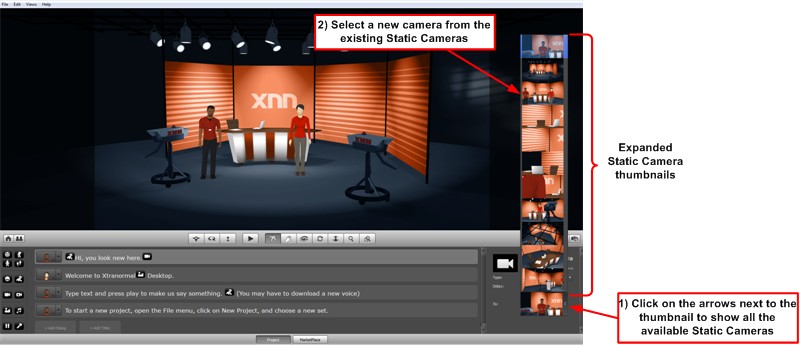
By clicking on the Static Camera panel button, all the available Static Camera shots are shown in thumbnails to the right of the 3D view. (Note, the initial set of available Static Cameras were placed by nawmal artists during the creation of the set. They represent a typical set of shots that a director might want for a given set. You simply have to click on one of the thumbnail shots and the current 3D view will switch to that camera. You can delete an existing camera by clicking on the trash can below the camera’s thumbnail. You can add a new camera by clicking on the camera ‘plus’ button ![]() and a new camera will appear at the bottom of the thumbnail pack. The new camera will have the properties of the current 3D View. Any of the Static Cameras can be updated to the current 3D View by clicking on the camera update button
and a new camera will appear at the bottom of the thumbnail pack. The new camera will have the properties of the current 3D View. Any of the Static Cameras can be updated to the current 3D View by clicking on the camera update button ![]() underneath the thumbnail.
underneath the thumbnail.
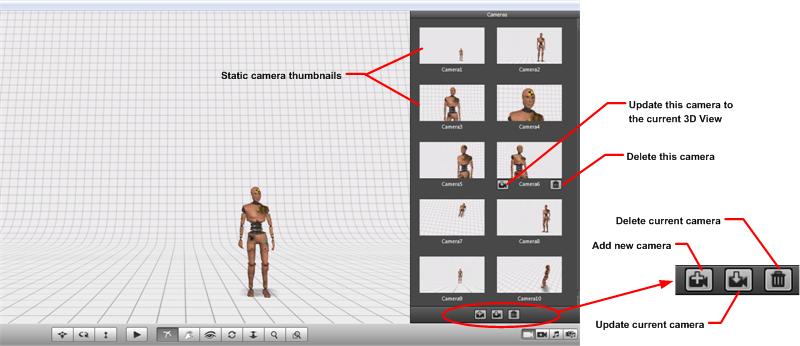
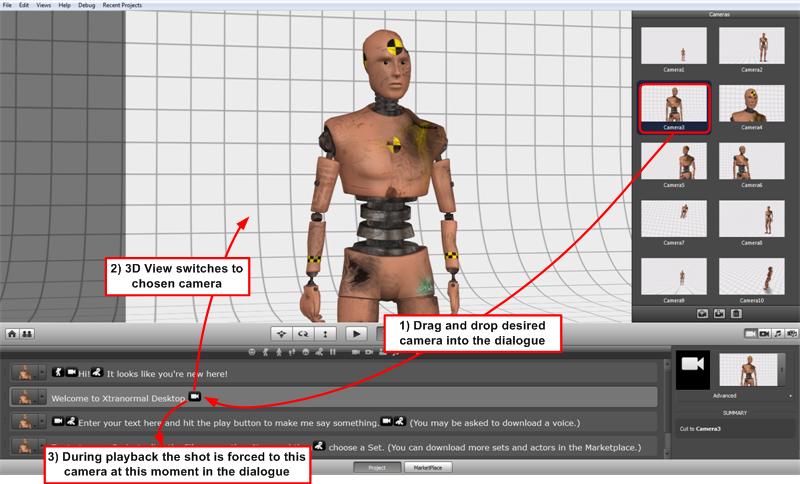
Any of the camera thumbnails can be dragged and dropped directly into the dialogue to place a camera Event Icon at that location in the dialogue. Placing a Static Camera Event Icon in this way will force the shot to that particular camera at that moment in the dialogue.
Once a camera is in the 3D View, the camera manipulation buttons can be used to modify the position and field of view of the camera. However, the camera will not update to the new properties until you use the update button. Any of the cameras can be updated to the new view, you do not have to update the camera from which you started.
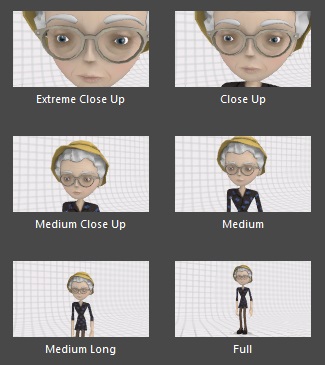
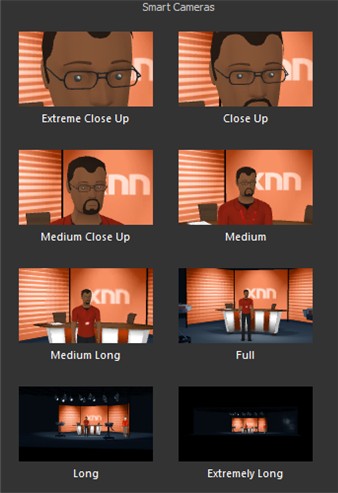
Clicking on the Smart Camera panel button loads all the available Smart Camera thumbnails to the right of the 3D View. The Smart Cameras are set to capture the following camera shots: Extreme close up, Close up, Medium Close up, Medium, Medium Long, Full, Long, Extremely Long.
You simply have to click on one of the thumbnail shots and the current 3D view will switch to that camera. You can save the view from any of the Smart Cameras by clicking on the camera ‘plus’ button ![]() to create a Static Camera at the same position as the Smart Camera. (This new camera appears in the Static Camera panel and not in the Smart Camera panel. This is very useful when used in conjunction with the automatic camera cuts feature in the Set Panel). New Smart Cameras can not be added or deleted.
to create a Static Camera at the same position as the Smart Camera. (This new camera appears in the Static Camera panel and not in the Smart Camera panel. This is very useful when used in conjunction with the automatic camera cuts feature in the Set Panel). New Smart Cameras can not be added or deleted.
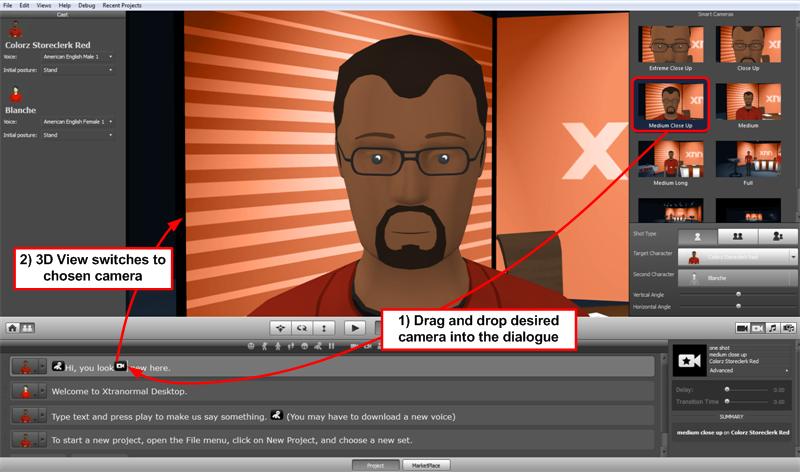
Any of the camera thumbnails can be dragged and dropped into a dialogue box to place a camera Event Icon at that location in the dialogue. Placing a Smart Camera Event Icon in this way will force the cinematographer to use that particular camera at that moment in the dialogue. More information on how to use Smart Cameras can be obtained in the section covering the Smart Camera Event Icon.
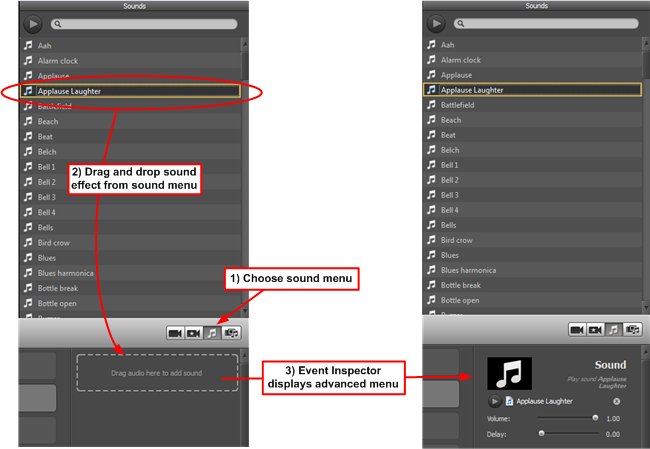
The Sound panel is pre-loaded with dozens of audio files that can be used for sound effects or ambiance. The sound effects are specifically timed with the dialogue and so to add one to your story you need to add a Sound Effect Event Icon directly in the dialogue and then drag a sound into that event icon. Ambiance sounds are sound files that are recursively played as background throughout a scene. To create ambiance the sound must be dragged into the Set Panel so that it is part of the set.

The media panel allows you to add external media such as audio, photos and videos to a
story. You simply have to click on the plus button ![]() which opens a window allowing you to search your computer for media. You can alternatively drag and drop media files directly from windows explorer.
which opens a window allowing you to search your computer for media. You can alternatively drag and drop media files directly from windows explorer.
Audio: You can import audio files that can be used for timed sound effects or for general ambiance. The sound effects are specifically timed with the dialogue and so to add one to your story you need to add a Sound Effect Event Icon directly in the dialogue and then drag your imported sound file into that event icon. Note that comes preloaded with dozens of common sounds in the Sound Panel. Your imported files can also be used for ambiance sounds which are recursively played as background sound throughout a scene. To add an ambiance sound to a story the sound must be dragged into the Set Panel.
Photos: The photos you import into the media library are to be used with inlays. Inlays are specific locations where images can be added to a scene. There are two locations within a story for inlays, either directly on characters or within the background sets. To learn how to add set inlays to your story see Photo Inlays or the Set Panel depending on whether you want to insert a photo at a specific time or if you want it to be permanently visible throughout the story. To learn how to add a character inlay to your story see the Cast Panel. Note that not all characters and sets have inlay capability. The ones that do are indicated by a special logo.
Videos: The videos in the media library are for use with set inlays. Inlays are specific locations where images or videos can be added to a scene. To learn how to add a video via the set inlays see Photo Inlays. Not all sets have inlay capability. The sets with this ability are denoted in small inlay image in the top right corner of the thumbnail as shown below.

Videos and images can be previewed directly in the Media Panel by simply clicking on the item in the list (and pressing the play button for the videos). You can adjust the size of the viewing window simply by dragging it down.
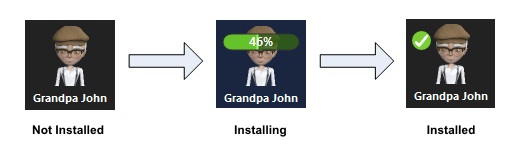
The character panel lets you bring characters into your story. Clicking on the character button at the bottom of the screen will display all the characters that have been created for . They are organized into themed collections. A character's status can be either 'installed' or 'not installed' on a given computer since you can install on multiple computers. The
status of each character is shown using a coloured check mark: a green check
mark ![]() indicates that a character is installed
indicates that a character is installed
is versatile in that you can create stories with a mixture of characters and sets, there is no need to stick to the same collection. You can mix characters from the Suits collection with others from the Peeps and have loads of fun. However, to assist you in making thematic stories, you can display characters by theme using the ‘Collection’ menu on the left hand side. However, since character styles and body proportions can vary heavily from one collection to another, be aware that camera angles that comes with a specific set could be framing your characters incorrectly.
Placing characters: Characters are placed in the scene directly from the character panel via a simple drag-and-drop method. Use the mouse to grab the character of your choice and drag it directly to any area in the scene. A blue target shows the location in the scene where the character will be placed. Characters can be dragged and dropped into the story whether they are installed or not; however, if they are not yet installed a download box will pop up to inform you of the installation. Note that all characters go through this one time download the first time they are used on a given computer. This is done to avoid a massive download that would be required if we downloaded all the characters up front (hundreds of characters x 5MB each = long download time).
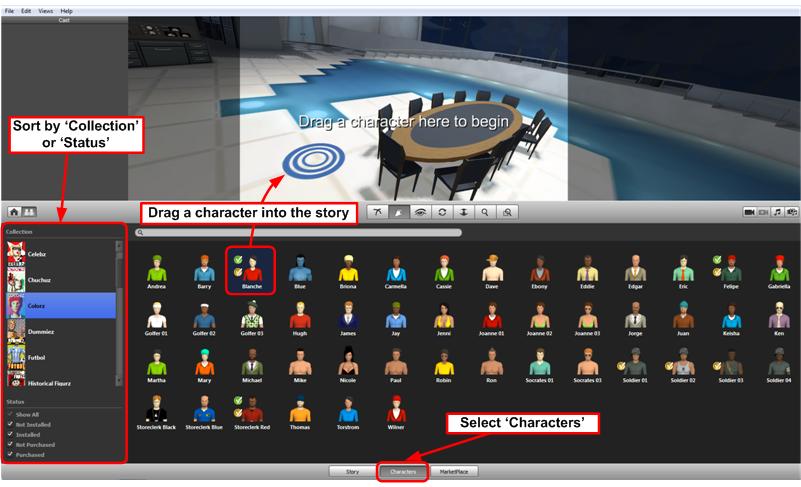
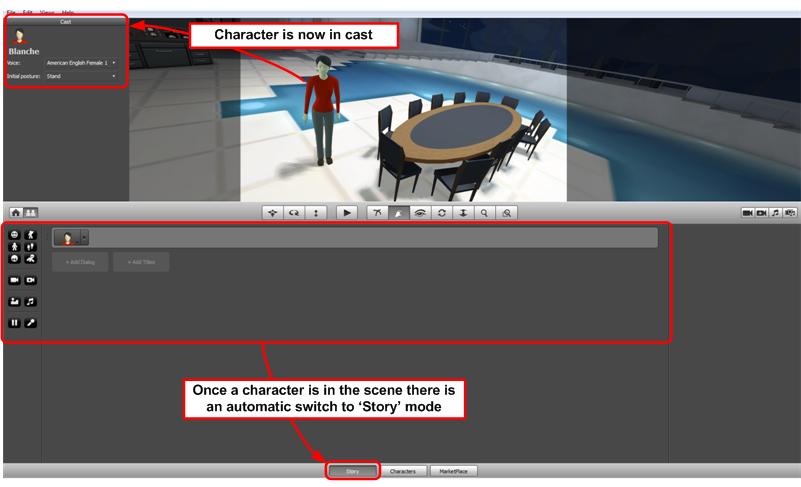
Once the first character is in place the bottom panel switches to 'Story' mode and the writer becomes visible. Also, the cast panel automatically opens to show the details of the character that has been added. To add another character, click the Characters button to show the Characters Panel and drag and drop a new one.
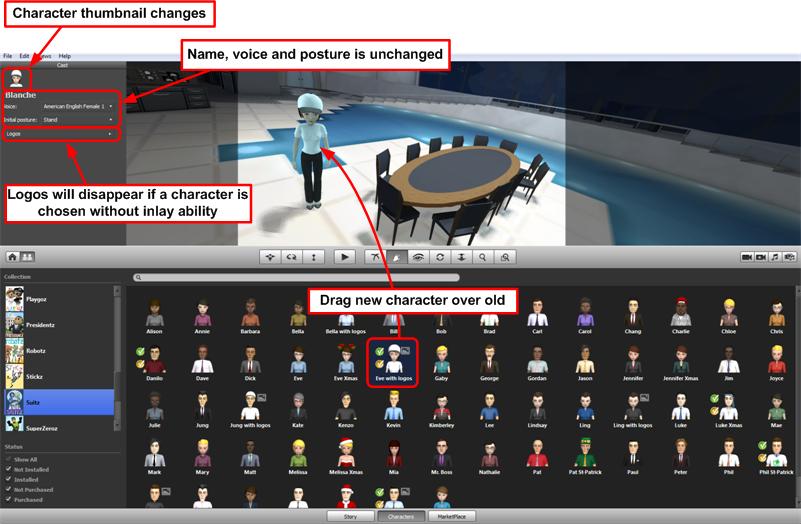
Changing characters: To change a character simply drag a new character over the top of a character in a scene. The character will be replaced; however, the name, voice and initial stance of the character will not be changed in order to retain any customizations you may have already made.
Certain characters have the image inlay ability which allows them to have embed logo images. The characters with this ability are denoted in small inlay image in the top right corner of the thumbnail as shown below.
You can add inlays to these characters via the Cast Panel located on the left of the 3D View.
Each collection of characters has their own native sets which were designed to match the style of those characters. However, within , any set can be used with any character, which can lead to some strange but interesting juxtapositions. Let your creative side come through when matching characters and sets.
Text-to-Speech (TTS) is a technology that takes text and converts it into an audio format that when played, sounds like the text is being recited. The goal of the technology is to sound as natural as possible; however, the results vary depending on the voice used for the conversion and the exact text. allows you to use any Text-to-speech voice already available on your computer and provides you with the ability to install more. These voices have accents from many languages from around the world. Text-to-Speech is the default used to recite the dialogue in the Writer. You have the ability to override the TTS engine if you wish to use your own voice via the Voice Over feature.
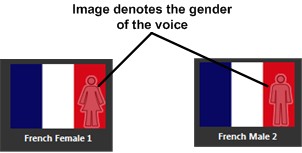
Voices can be downloaded for free by clicking "Get more voices" in the Character panel. The available voices are grouped by accent, with the accent denoted by the flag of the country were the accent is most prevalent. A shaded image of a man or woman on the flag denotes whether the accent is male or female.
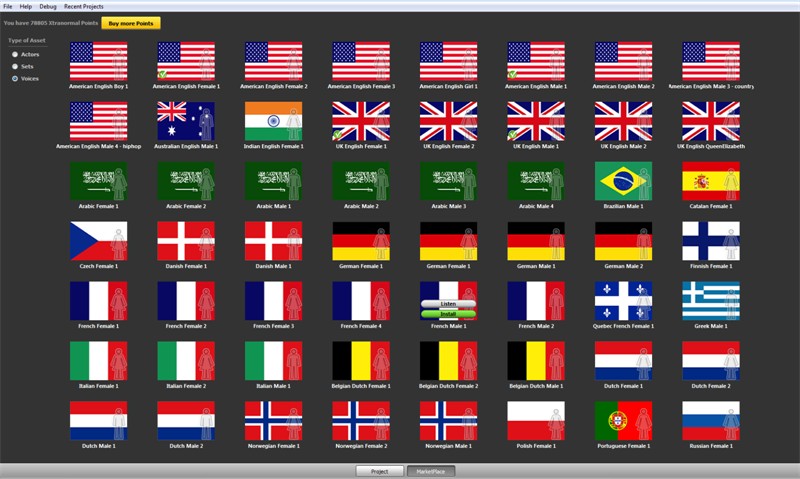
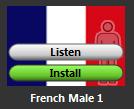
Note that the clarity of the dialogue depends on the specific voice, accent and choice of words in the dialogue. For this reason each voice can be sampled before you install the voice on your computer. To listen to a voice, you simply have to pass the cursor over a flag and click the ‘Listen’ button.
You have the option of using the default Text-to-Speech voices or alternatively you can record and use your own voice for characters. The Voice over feature is what allows this. The details of how to use this feature can be found in the Voice Over section of the Drag-and-Drop Event Icons.
The following are some cinematography tips that can help you create interesting camera effects and movements during the playback of your story. Note that there is an important distinction to be made between camera manipulation in the 3D view and camera movement during playback of a story. The camera manipulation tools are used to move and position cameras in the 3D viewer during story creation. Once all the cameras are placed in the 3D View, the camera Motion feature can be used to create motion between these cameras during playback. So, to create a camera movement effect during playback you need to do two things: First, use the camera manipulation tools to position your cameras; then use the Motion features of the cameras to create movement (both Smart Cameras and Static Cameras have Motion features).
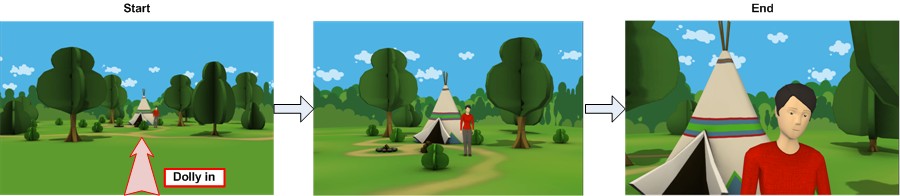
In cinematography, dollying is the act of moving the camera on a set of rails either into and out of the scene or horizontally across a scene . With , dollying can combine many complex movements without any restrictions as to height or pivoting. Camera shots can be made to move smoothly from any one camera shot to any other regardless of orientation or position.
Dollying can be achieved by applying motion between two cameras that were created using the dolly, orbit and pan tools. First, start with a Static Camera and move it into the initial position. Save this as a Static Camera. Then create a second camera and move it to the final position by using the dolly, orbit and pan tools. Save the second camera as a new Static Camera. Now, place a Static Camera Event Icon in the dialogue and use the Static Camera Motion feature to move from the first camera to the second. will automatically calculate a smooth trajectory between the two cameras. Modify the transition time in the Event Inspector to change the speed of the dolly during playback.
Note: You can also dolly to a Smart Camera (i.e. use a Smart Camera for the destination). This can save time since Smart Cameras are automatically positioned. To transition to a Smart Camera simply use the Smart Camera Event Icon in the dialogue as well as the Smart Camera Motion.
Tracking is a special type of dollying where the camera only moves horizontally in the plane of the screen while craning involves a vertical movement. Tracking and craning can be achieved by applying motion between two cameras that were created using the pan tool. First, start with any saved camera and then create a second camera from that first one by using the pan tool. Save the second camera. Now, insert a Static Camera Event Icon in the dialogue and use the Motion feature to move from one camera to the other (one camera is selected as the 'From' camera while the other is selected as the 'To' camera). During playback, the camera motion will follow a straight line between the two cameras. Modify the transition time to change the speed of the movement during playback.
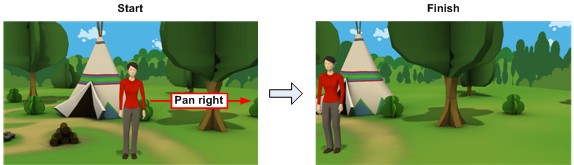
Panning is the horizontal pivoting of a stationary camera while tilting is the vertical pivoting of a stationary camera. These are point-of-view movements equivalent to turning your head from side to side (panning) and tilting your head up and down (tilting). They can be achieved using the Look tool to pivot the camera either horizontally or vertically. To create a pan, start with a saved camera and use the Look tool to pivot either left or right. After pivoting save the view as a new Static Camera. Now, insert a Static Camera Event Icon in the dialogue and use the Motion feature to move from one camera to the other. During playback, the camera motion will pivot between the two cameras. Modify the transition time to change the speed of the pan during playback. To create the tilt, follow the same instructions but instead pivot the camera up or down with the Look tool.
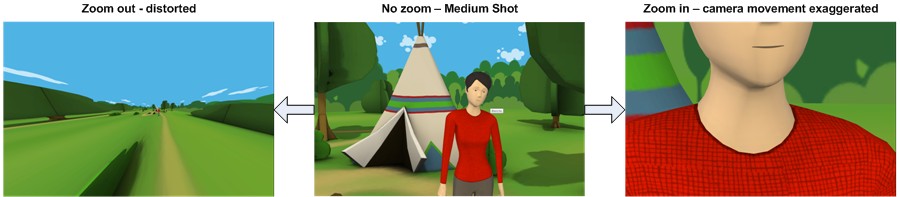
You can apply motion from a distorted camera view to a normal one giving the impression that the viewer is in warp drive. To do this, take a saved camera and create a distorted camera by zooming out with the zoom tool (the camera can also be panned and orbited after zooming out to add more effects to the motion). Save the distorted camera as a new camera. Now, insert a Static Camera Event Icon in the dialogue and use the Motion feature to select the distorted camera as the 'From' camera and the non-distorted camera as the 'To' camera (or vice-versa if you want to 'warp' backwards). Modify the transition time to change the speed of the warp motion.
The vertigo shot is a cinematographic effect made famous in Hitchcock's 1958 movie Vertigo. In the effect, the camera is simultaneously dollied and zoomed in combination such that a character remains the same size on the screen, but the background either grows or shrinks. To create the effect the camera needs to be either dollied out and zoomed in simultaneously, or dollied in and zoomed out simultaneously. With , this effect can be created by using both the dolly and zoom tools. First, take a saved Static Camera (you can use a Smart Camera to create a new Static Camera) and create a zoomed out (or zoomed in) image using the zoom tool. Then, use the dolly tool to move the camera forward or backwards (depending on whether you zoomed out or in respectively) until the 3D View frames the subject in approximately the same way. Save this view as a new Static Camera. Now, insert a Static Camera Event Icon into the dialogue and use the Motion feature to set one camera as the 'From' camera and the other as the 'To' camera. Use the transition time to change the speed of the motion.
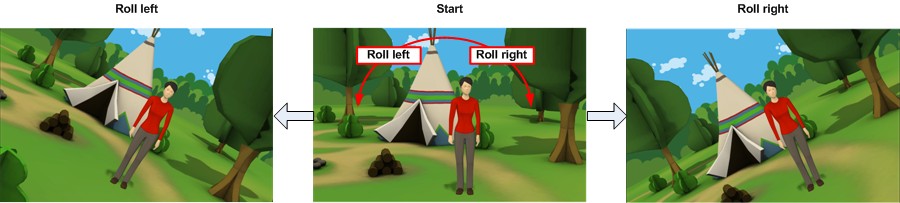
This movement simulates the rocking motion of a boat; or if done in a jagged way could simulate an earthquake. To create the effect, take a camera and use the Roll tool to roll the scene either to the left or right and save the camera as a new Static Camera. Then use the Roll tool again to roll in the opposite direction and save that as a Static Camera as well. Now drag a Static Camera Event Icon into the dialogue and use the motion setting in the camera’s Event Inspector to switch from one camera to the other. The speed is controlled by adjusting the transition time. This will result in the scene rocking from one side to the other, however another Static Camera Event Icon needs to be inserted after the first so that the camera will rock back the other way. These two camera Event Icons should be copied in the dialogue to keep the scene rocking.